
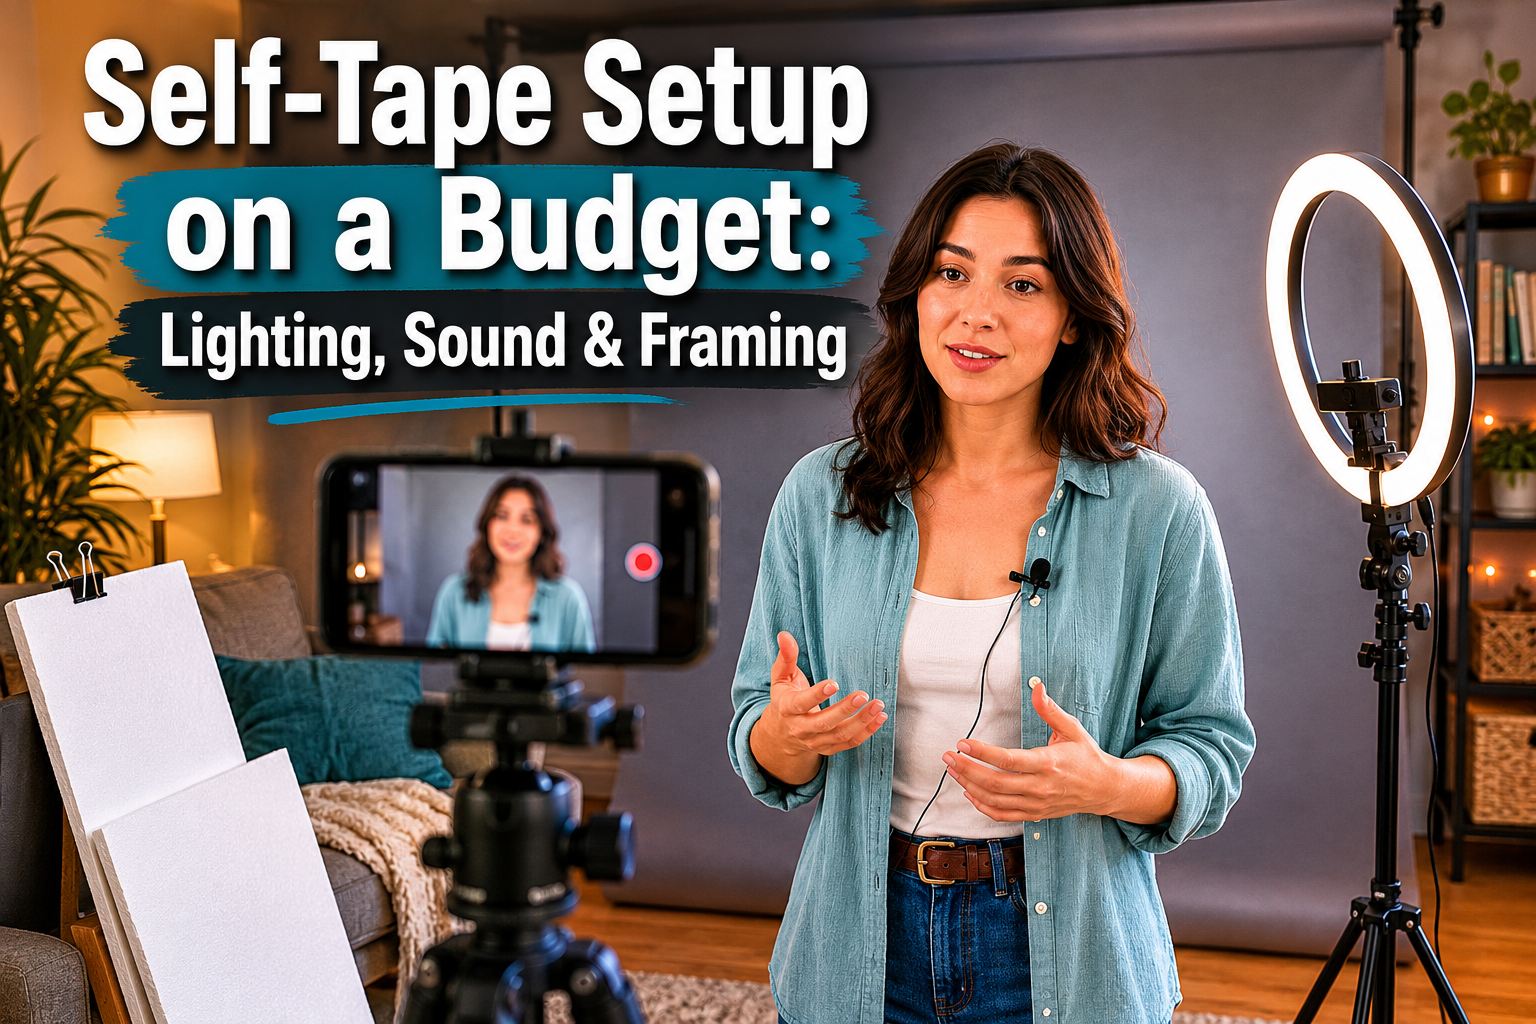
A casting director in Los Angeles recently told a room full of actors that she watches each self-tape for about seven seconds before deciding whether to keep watching or move on. Seven seconds. That is less time than it takes to microwave a bag of popcorn. And in those seven seconds, she is not judging your Meisner technique or your emotional depth. She is noticing whether your face is lit properly, whether your audio sounds like you recorded it inside a tin can, and whether the framing looks professional. The good news? Nailing a self-tape setup on a budget: lighting, sound & framing does not require a film school degree or a second mortgage. It requires about $75 to $150 in gear, a bit of know-how, and maybe an hour of setup time.
After thirty years of working in theater, commercials, and voice over, here is something that still surprises people: the actors who book consistently in 2026 are not always the most talented ones in the room. They are the ones whose tapes look and sound clean enough that casting directors can actually focus on the performance [2]. Self-tapes have fully replaced most first-round auditions, and the expectation now is that your tape should feel as polished as an in-room read [10]. That is the bar. Let’s get you over it without emptying your wallet.
Key Takeaways
- Lighting is free if you have a window. Natural daylight, properly positioned, beats a $300 light kit used badly. A $5 foam board can fill shadows on the cheap side of your face.
- Sound is the silent killer. Bad echo and background noise will get your tape skipped faster than bad lighting. A quiet room with soft furnishings costs nothing; a decent lavalier mic runs $20 to $30.
- Framing follows simple rules. Chest-up, horizontal, slight headroom, eyeline just off the lens, neutral background. These are non-negotiable in 2026 casting.
- Your smartphone is enough. A modern phone camera paired with good light and clean audio produces a professional-quality tape. You do not need a DSLR.
- Total budget can be under $100. A tripod ($15-$25), a ring light or softbox ($20-$50), a lav mic ($20-$30), and a foam board ($5) cover the essentials.
Table of Contents
- Why Technical Quality Matters More Than Ever
- Lighting: The First Pillar of Your Self-Tape Setup on a Budget
- Sound: The Second Pillar That Most Actors Ignore
- Framing: The Third Pillar of a Professional Self-Tape Setup on a Budget
- The Budget Gear List
- Pre-Record Checklist
- FAQ
- Conclusion
Why Technical Quality Matters More Than Ever
Here is a quick story. Back in 2019, a friend of mine booked a recurring role on a network show. Great actor. But he almost did not get seen because his first tape was shot vertically, with a lamp behind his head creating a full silhouette, and the audio picked up his neighbor’s leaf blower. His agent made him re-tape. The second version, shot with window light and his phone propped on a stack of books, got him the callback.
The point is not that gear does not matter. The point is that understanding the basics matters more than spending money. Stage One Talent’s 2026 guide puts it plainly: lighting and sound are the “technical foundation,” while camera choice is secondary [1]. A modern smartphone is more than capable if light and audio are controlled. Casting directors in 2026 expect clean, well-framed tapes as a baseline, not a bonus [5]. If your tape looks amateur, they will assume you are amateur. Fair? Maybe not. True? Absolutely.
For a deeper look at what casting teams expect this year, check out our guide on mastering self-tape auditions for theater beginners.
Lighting: The First Pillar of Your Self-Tape Setup on a Budget
Lighting is where most actors either overthink things or do not think at all. Both are problems. Let’s keep it simple.
Start With a Window (It’s Free)
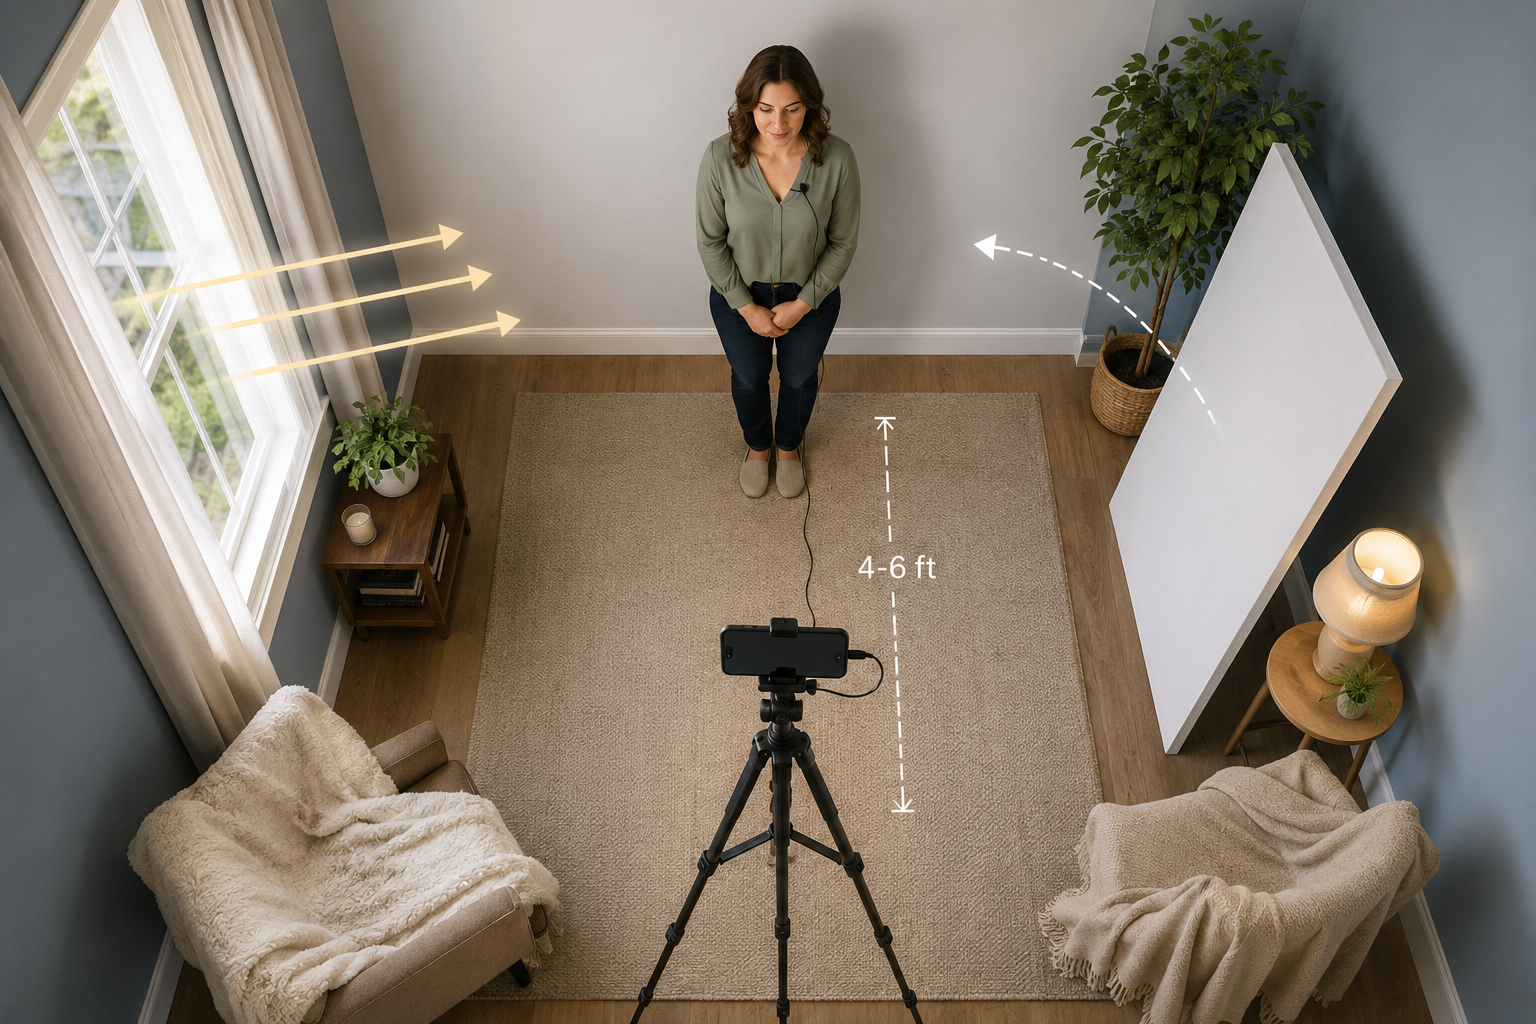
The single best light source for a self-tape is a window with indirect daylight. Not direct sunlight blasting through, which creates harsh shadows. Indirect, diffused daylight. Face the window. Put your camera between you and the window (or just to the side of it). That is your key light, and it costs zero dollars [4].
A north-facing window is ideal because it rarely gets direct sun. If your only window faces south or west, hang a sheer white curtain or tape a white bedsheet over it to soften the light. Seriously. A bedsheet. This is not glamorous, but it works.
The critical rule: Never put a bright window or lamp behind you. You will become a silhouette, and the casting director will see a dark blob delivering a monologue [1]. That is not the artistic choice you want to make.
The $5 Foam Board Bounce Trick
Here is a trick that has saved countless self-tapes. Buy a white foam board from any dollar store or craft shop (about $5). Prop it up on the opposite side of your face from the window, angled at roughly 45 degrees toward you. The foam board bounces the window light back onto the shadow side of your face, creating soft, even fill light. It is basically a poor actor’s reflector, and it looks shockingly professional.
If you want to understand more about how lighting principles work across performance spaces, our piece on lighting design for small theater productions covers the fundamentals beautifully.
When You Need Artificial Light
Windows are great until the sun goes down or you live in a basement apartment (been there). Here is where a small investment pays off.
Ring lights ($15-$40): These are the most popular budget option. They produce even, front-facing light and are easy to set up. One honest caveat, though: ring lights can create circular catch-lights in your eyes that look a bit unnatural, and the light tends to be flat [8]. For a lot of self-tapes, that flatness is perfectly fine. But if you want more dimension on your face, consider the next option.
Softbox lights ($25-$50 each): A pair of small softboxes gives you more control and a more natural look. You can position one as your key light (in front, slightly above eye level, off to one side) and the other as fill (opposite side, dimmer or farther away). A set of two basic softboxes runs about $50 to $100 on Amazon [6].
The bulb matters. Whatever light you use, make sure the bulbs are daylight-balanced, around 5000K to 5500K. Warm tungsten bulbs (the yellowish ones) will make your skin look orange on camera, and mixing warm bulbs with cool daylight from a window creates a color mess that screams “amateur.” Also, turn off any overhead room lights. Overhead light creates unflattering shadows under your eyes and nose. Think about it: nobody looks good under fluorescent office lighting. Nobody.
| Light Source | Cost | Pros | Cons |
|---|---|---|---|
| Window (indirect daylight) | Free | Soft, natural, flattering | Time-dependent, weather-dependent |
| White foam board (fill) | $5 | Fills shadows, portable | Needs a light source to bounce |
| Ring light | $15-$40 | Even, easy setup | Flat light, circular eye reflections |
| Softbox (pair) | $50-$100 | Natural look, adjustable | Takes more space, more setup |
| Daylight LED panel | $25-$60 | Compact, dimmable | Can be harsh without diffusion |
Sound: The Second Pillar That Most Actors Ignore
Here is the thing about sound that took me years to fully appreciate: people will forgive slightly imperfect lighting. They will not forgive bad audio. A tape with echo, hiss, or background noise is almost physically uncomfortable to listen to, and casting directors will skip it immediately [1]. The two biggest tape-killers are bad lighting and echoing audio, and honestly, bad audio might be the worse offender.
The Quiet Room Is Your Best Investment
Before you spend a dime on microphones, find the quietest room in your home. Close the windows. Turn off the air conditioning or heating (yes, even if it is uncomfortable for ten minutes). Shut off the TV in the other room. Put your phone on silent. If you have a dog, bribe it with treats to stay quiet. If you have a cat, well, good luck with that.
Hardwood floors, bare walls, and high ceilings are echo factories. If your room sounds like a racquetball court when you clap your hands, you need to add soft surfaces. Hang blankets on the walls behind and beside you. Drape towels over hard furniture. Pull a couch or stuffed chair into the room. Lay down a rug. These are not permanent changes. You are just temporarily deadening the space so your voice sounds clean and present instead of hollow and distant [3].
For actors also building a voice over setup, our home studio equipment guide goes into much more detail on acoustic treatment.
Budget Microphones That Actually Work
Your phone’s built-in microphone is decent if you are within four to six feet of it in a quiet, treated room. But a cheap external mic makes a noticeable difference.
Clip-on lavalier mics ($15-$30): These little wired mics clip to your shirt collar or neckline and plug directly into your phone. They pick up your voice clearly while rejecting a lot of room noise. The key is to clip the mic about six to eight inches below your chin, on the center of your chest, and make sure the wire is hidden or at least not dangling in the frame. Tuck it under your shirt and run the cable behind you.
Wireless lavalier mics ($40-$80): If you hate dealing with wires, wireless options have gotten surprisingly affordable. They give you more freedom of movement, which matters for physical scenes.
One rule: Keep the mic out of the frame. If a casting director can see a big microphone clipped to your collar, it is distracting. Small and discreet is the goal.
For more on how audio shapes a performance space, take a look at our article on sound design for theater and immersive storytelling.
Framing: The Third Pillar of a Professional Self-Tape Setup on a Budget
Framing is where a lot of actors get tripped up because they think there is room for creativity. There is not. Self-tape framing follows specific conventions, and casting directors expect them. Think of it like a sonnet: the structure is rigid so the art inside it can breathe.
The Medium Shot
Frame yourself from roughly mid-chest up. Leave a little bit of headroom above your head, maybe two to three inches of space on screen. Do not cut off the top of your head. Do not frame so wide that you are a tiny figure in a big room. The casting director wants to see your face, your eyes, and enough of your upper body to read your physical choices [2].
Shoot Horizontally
This is non-negotiable in 2026. Horizontal (landscape) orientation. Not vertical. Vertical video reads as social media content, and professional casting platforms like Spotlight explicitly require landscape format [5]. Turn your phone sideways. Lock it in a tripod. Done.
A basic phone tripod costs $15 to $25 and is one of the best investments you will make. No more propping your phone against a stack of books that falls over mid-take. (Yes, that has happened to me. During what I thought was my best take. The phone toppled forward and recorded thirty seconds of carpet.)
Eyeline and Reader Placement
Your eyeline should be just slightly off the lens, not directly into it (unless specifically asked). This means your reader, the person reading the other character’s lines, should sit or stand right next to the camera, as close to the lens as possible without being in frame. The closer the reader is to the lens, the more natural your eyeline looks to the casting director.
If you are working alone, tape the script pages next to the lens at eye level. Some actors use a tablet propped beside the phone. Just keep your eyes close to that lens.
For advanced techniques on eyeline and camera awareness, our guide on camera literacy drills for professional self-tapes is a great next step.
Background
Neutral. Clean. Boring on purpose. A plain wall in gray, blue, beige, or white works perfectly. No posters, no bookshelves full of distracting knickknacks, no windows showing traffic. If your walls are busy, hang a solid-colored bedsheet or buy a simple muslin backdrop ($15-$25) [7].
Wear solid colors with no logos, patterns, or stripes. Avoid pure white (it blows out under lights) and pure black (it absorbs too much light). Medium tones work best.
Lock Your Settings
Before you hit record, tap your phone screen on your face and hold to lock focus and exposure. On most phones, you will see an “AE/AF Lock” indicator. This prevents the camera from constantly refocusing or adjusting brightness mid-scene, which looks terrible and screams “phone video” [10].
If you are transitioning from stage work and want to understand how to scale your performance for the camera, our article on adapting theater skills for the self-tape era is worth a read.
The Budget Gear List
Here is everything you need, broken into tiers.
Bare Minimum (Under $30):
- Smartphone (you already own one)
- Phone tripod: $15-$25
- White foam board: $5
- Window light: Free
- Blankets for sound dampening: Free (use what you have)
Solid Setup ($75-$100):
- Everything above, plus:
- 12-inch ring light with stand: $20-$40
- Wired lavalier mic: $15-$25
- Neutral backdrop (muslin or bedsheet): $10-$20
Home Studio ($150-$200):
- Everything above, but swap the ring light for:
- Two small softbox lights: $50-$100
- Wireless lavalier mic: $40-$80
You do not need to start at the top tier. Plenty of actors book work with the bare minimum setup. The key is getting the fundamentals right [1].
Pre-Record Checklist
Run through this list before every single tape. Print it out. Tape it to the wall next to your setup. After a while it becomes second nature, but until then, use the list.
- Room quiet? AC off, windows closed, phone on silent, pets bribed.
- Lighting set? Key light (window or artificial) in front and slightly above. Fill light or foam board on the opposite side. No overhead lights. No backlight.
- Background clean? Neutral, uncluttered, no distracting objects.
- Camera horizontal? Landscape mode, locked in tripod.
- Framing correct? Chest-up, slight headroom, centered.
- Focus and exposure locked? Tap and hold on your face.
- Mic positioned? Clipped to chest, wire hidden, out of frame.
- Wardrobe checked? Solid colors, no logos, no patterns, no jewelry that clinks.
- Reader in position? Right next to the lens, not across the room.
- Test recording done? Always do a five-second test. Play it back. Check light, sound, and framing before committing to full takes.
For a comprehensive look at self-tape best practices and technology in 2026, our self-tape mastery guide covers the full picture.
FAQ
Q: Do I really need a tripod, or can I just prop my phone up? You really need a tripod. A $15 phone tripod keeps the frame steady and at the right height. Propping your phone on books or shelves is unreliable, and any wobble during your take is immediately noticeable. It is the cheapest piece of gear that makes the biggest difference.
Q: Are ring lights bad for self-tapes? Not bad, just limited. Ring lights produce flat, even light that works fine for most auditions. Some actors and coaches prefer softboxes because they create more natural-looking dimension on the face [8]. If you already own a ring light, use it. If you are buying new, a pair of small softboxes around $50-$100 gives you more flexibility.
Q: Can I use my phone’s built-in microphone? Yes, if your room is quiet and you are within about five feet of the phone. But a $20 wired lavalier mic clipped to your shirt will sound noticeably better, especially in rooms that are not acoustically treated. It is a small upgrade with a big payoff.
Q: What if I do not have a reader available? Record the reader lines yourself on another device and play them back during your take, or use a text-to-speech app. Some actors tape the lines next to the camera and simply leave pauses. Having a live reader is always better because it gives you something real to react to, but casting directors understand that it is not always possible.
Q: Should I edit my self-tape or submit it raw? Light editing is fine and expected. Trim the beginning and end, cut between scenes if you have multiple, and make sure the audio levels are consistent. Do not add music, filters, color grading, or fancy transitions. Keep it clean and simple [7].
Q: Is vertical video ever acceptable? In 2026, the industry standard for casting submissions is horizontal (landscape) video. Vertical video is associated with social media and will look unprofessional on casting platforms [5]. Always shoot horizontally unless a casting notice specifically says otherwise.
Conclusion
A polished self-tape setup on a budget: lighting, sound & framing is not about spending a lot of money. It is about understanding a few core principles and applying them consistently. Face a window or set up a cheap light in front of you. Kill the echo in your room. Frame yourself chest-up in landscape mode against a clean background. Lock your focus. Hit record.
The actors who book in 2026 are not the ones with the fanciest equipment. They are the ones whose tapes look and sound clean enough that casting directors forget about the technical stuff entirely and just watch the performance. That is the goal. Make the technology invisible so your work can shine.
Start with the bare minimum setup. Shoot a test tape tonight. Watch it back critically. Adjust. Shoot again. Within a week, the whole process will feel as natural as warming up before a show. And your tapes will look better than half of what lands on a casting director’s desk. That is not a guess. That is thirty years of watching this business reward the actors who take the craft seriously, including the craft of presenting themselves well on camera.
Now go tape something great.
References
[1] Self Tape Setup Guide – https://castready.org/blog/self-tape-setup-guide
[2] Self Tape Audition Essentials How To Create Professional Auditions At Home – https://www.jcasablancas.com/self-tape-audition-essentials-how-to-create-professional-auditions-at-home/
[3] Dx7c0vcjck – https://www.instagram.com/reel/DX7C0vCJCK_/
[4] Self Tape Success Budget Mood Lighting Setup Guide – https://northernfilmanddrama.com/self-tape-success-budget-mood-lighting-setup-guide/
[5] Your Guide To Self Tapes – https://www.the-modern-actor.com/blog/your-guide-to-self-tapes
[6] Best Budget Youtube Lighting Kit 2026 – https://gvmled.com/best-budget-youtube-lighting-kit-2026/
[7] Self Tape Auditions – https://bernardhiller.com/self-tape-auditions/
[8] Self Tape Setup Guide – https://screenactbiz.com/self-tape-setup-guide/
[9] How To Create A Winning Self Tape Audition In 2025 – https://theplayground.com/how-to-create-a-winning-self-tape-audition-in-2025/