

Listen, after three decades in this business—from cramped black box theaters where the “lighting booth” was literally a folding chair with a dimmer board balanced on my lap, to professionally lit commercial sets—I’ve learned one universal truth: great lighting isn’t about how much money you spend; it’s about understanding the fundamentals.
Whether you’re an actor stepping into directing for the first time, a theater student managing your first production, or a seasoned performer who wants to understand why that side light makes your monologue pop, mastering Lighting Design Fundamentals for Small Theater Productions: Creating Mood and Focus on a Limited Budget will transform how you approach every performance. Think of lighting as your silent scene partner—one that never misses a cue and always knows exactly where the audience should look.
The beautiful thing about 2026? Technology has democratized theatrical lighting in ways we couldn’t have imagined even a decade ago. You no longer need a Broadway budget to create professional-quality lighting that serves your story and showcases your performers.
Key Takeaways
- LED fixtures are your best investment for small productions, eliminating ongoing gel costs and reducing energy consumption while providing full-color mixing capabilities[1][2]
- Three-point lighting configuration (key, fill, and backlight) creates professional results with minimal equipment and serves as the foundation for nearly every lighting scenario[2]
- Color theory delivers powerful emotional impact without expensive equipment—warm colors create intimacy and energy, while cool colors evoke mystery and isolation[1][2]
- Strategic zone lighting allows you to do more with less by dividing your stage into controllable areas rather than lighting everything simultaneously[1]
- Understanding light positions (front, side, back) and their specific purposes helps you prioritize fixture placement based on your production’s unique needs[2][3]
Understanding the Foundation: Why Lighting Matters for Actors and Small Productions
Here’s something many actors don’t realize until they’ve been in the business for years: lighting design is storytelling. It’s not just about making sure the audience can see your face (though that’s certainly important). Lighting creates the emotional landscape of every scene, directs focus better than any stage direction, and can make a $500 budget production look like a million bucks—or make a well-funded show look amateurish if done poorly.
I remember a production of A Streetcar Named Desire in a 50-seat theater where our entire lighting budget was about $800. The director was panicking, convinced we’d need to perform in full house lights. But by understanding the fundamentals—color temperature, strategic positioning, and intensity control—we created lighting that had audience members asking where we’d hidden all the expensive equipment. The secret? We didn’t fight our limitations; we worked with them intelligently.
The Four Essential Functions of Stage Lighting
Before we dive into specific techniques, let’s establish what lighting actually needs to accomplish:
- Visibility – The audience must see the performers clearly (seems obvious, but you’d be surprised)
- Focus – Directing audience attention to specific areas, performers, or actions
- Mood – Creating emotional atmosphere that supports the story
- Composition – Adding depth, dimension, and visual interest to the stage picture
Every lighting choice you make should serve at least one of these functions—ideally multiple simultaneously.
Lighting Design Fundamentals for Small Theater Productions: Essential Equipment on a Budget
Let’s talk practical realities. You’re working with limited funds, limited space, and probably limited technical support. The good news? You can create professional lighting with a surprisingly minimal toolkit.
LED Fixtures: Your Primary Investment
If there’s one piece of advice worth its weight in gold, it’s this: invest in LED fixtures from the start[1][2]. Yes, they cost more upfront than traditional incandescent fixtures, but here’s the math that changed my mind back in 2019:
Traditional Incandescent Fixtures:
- Lower initial cost ($50-150 per fixture)
- Require color gels ($5-15 per gel sheet, need replacing regularly)
- High energy consumption (500-1000 watts per fixture)
- Generate significant heat (uncomfortable for performers, venue concerns)
- Bulbs burn out and need replacement
LED Fixtures:
- Higher initial cost ($150-400 per fixture)
- Built-in color mixing (no gels needed—ever)
- Low energy consumption (50-200 watts per fixture)
- Minimal heat generation
- Bulbs last 50,000+ hours
Over a single season of productions, LED fixtures typically pay for themselves through eliminated gel costs and reduced electricity bills[1]. Plus, the ability to change colors instantly during tech rehearsals without climbing ladders to swap gels? Priceless.
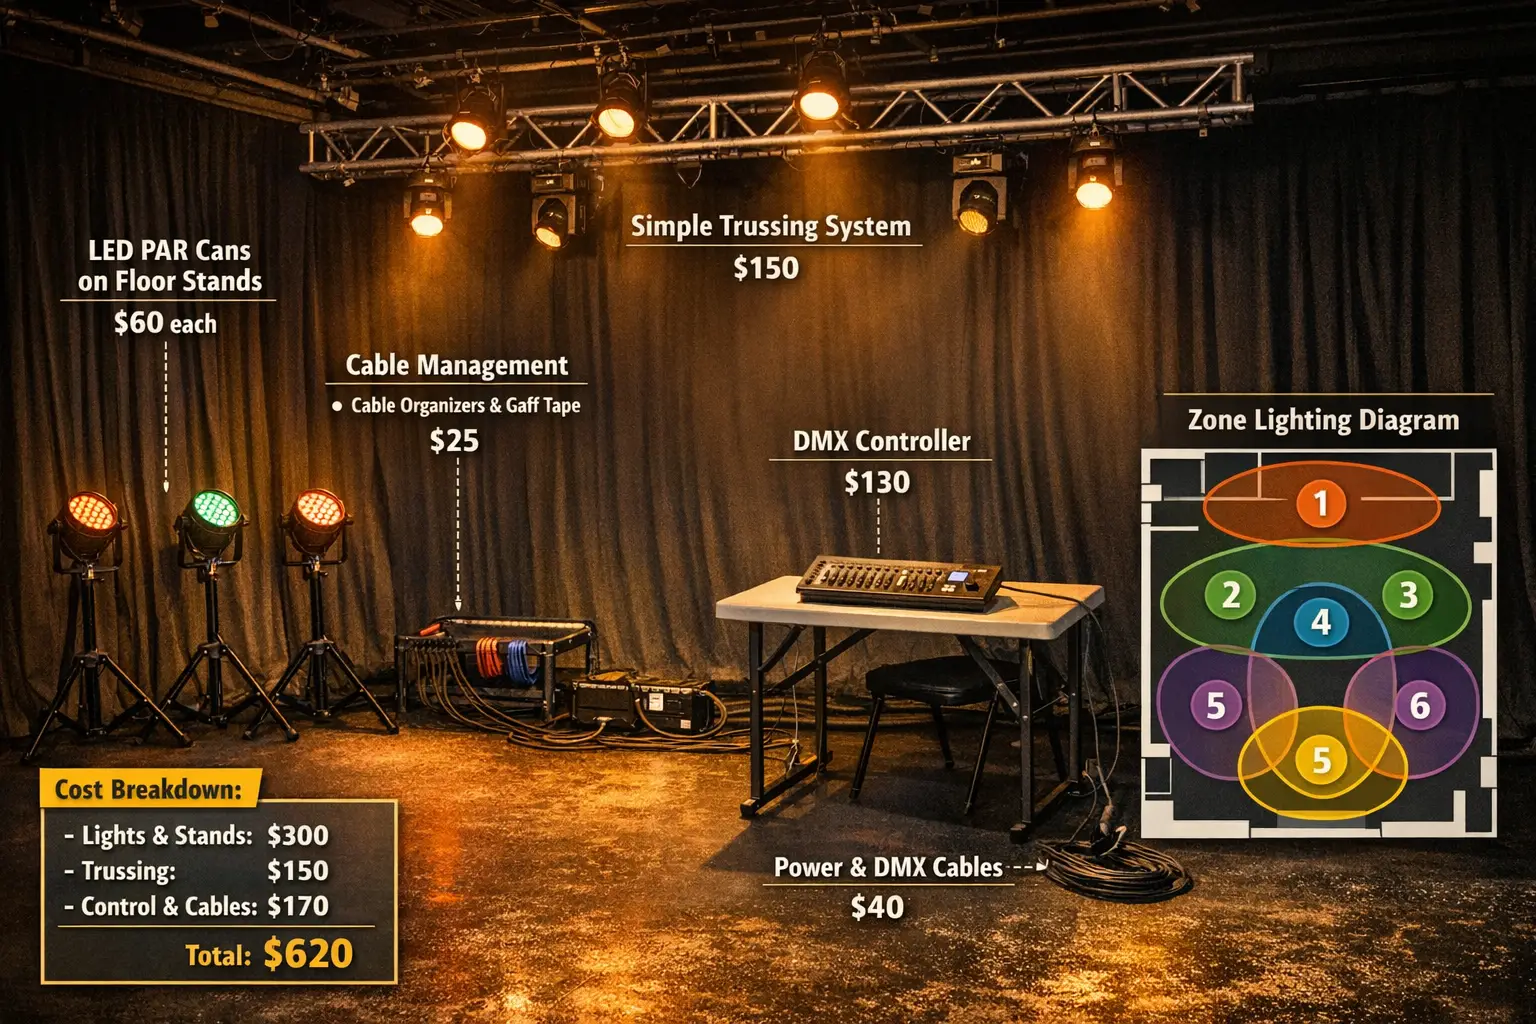
Floodlights: The Workhorse of Small Productions
Floodlights (also called area lights or flood washes) are identified as the most common and cost-effective lighting fixtures for small theaters[3]. These fixtures provide uniform light distribution across stage areas without requiring multiple specialized fixtures—think of them as the reliable character actors of your lighting inventory.
A basic floodlight setup might include:
- 4-6 LED PAR cans (the cylindrical fixtures you’ve seen in every theater)
- 2-4 LED flood panels for general wash coverage
- Basic dimmer/control board (even a simple 8-channel board works wonders)
This minimal setup, costing roughly $1,200-2,000 total, can light most small theater productions when positioned strategically.
Infrastructure You Cannot Skip
Look, I’m all for creative budgeting, but some elements are non-negotiable for safety[1]:
- Lighting stands or trussing – Fixtures need secure mounting
- Safety cables – Always, always, always use them
- Proper electrical distribution – No daisy-chaining extension cords
- DMX cables – For reliable fixture control (wireless DMX options reduce cabling needs but cost more upfront)[1]
Cutting corners on infrastructure is how people get hurt. Don’t do it.
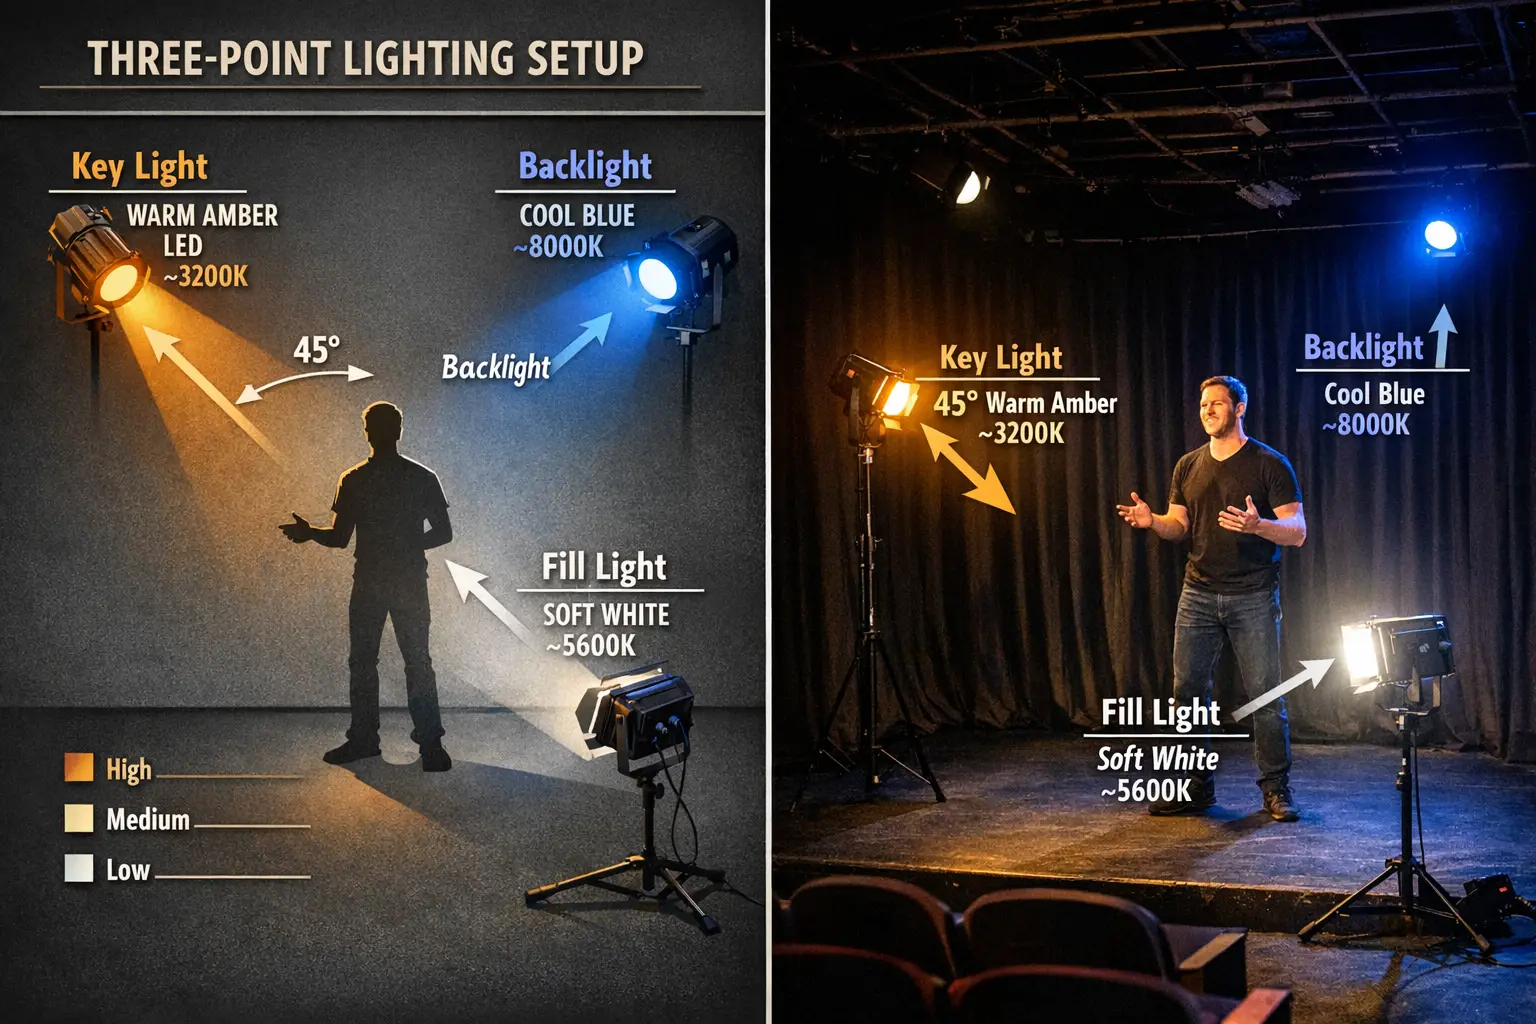
The Three-Point Lighting Configuration: Your Professional Foundation
Here’s where Lighting Design Fundamentals for Small Theater Productions: Creating Mood and Focus on a Limited Budget gets practical. The three-point lighting system is the single most important technique you’ll learn[2]. It’s been used in theater, film, and photography for nearly a century because it simply works.
Breaking Down Three-Point Lighting
1. Key Light (Primary Source)
- Position: 45 degrees to the side and above the performer
- Purpose: Primary illumination, establishes the dominant light source
- Intensity: Brightest of the three lights
- Color: Often warm (amber/light yellow) to flatter skin tones
2. Fill Light (Shadow Softener)
- Position: Opposite side from key light, lower angle
- Purpose: Softens shadows created by key light without eliminating them
- Intensity: 30-50% of key light intensity
- Color: Usually neutral or slightly cool to create subtle modeling
3. Backlight (Separation Creator)
- Position: Behind and above the performer
- Purpose: Separates performer from background, adds depth and dimension
- Intensity: Varies based on desired effect (50-100% of key light)
- Color: Often contrasts with key light (cool if key is warm, or vice versa)
This configuration creates professional-looking illumination with just three fixtures per performing area. For a small stage, you might need 6-9 total fixtures to cover the full space—well within budget constraints[2].
The McCandless Method: A Classic Variation
The McCandless Method builds on three-point lighting with a specific approach: two lights at 45-degree angles (one warm, one cool) positioned in front of the performer[1]. This technique naturally models faces and creates subtle, flattering dimension without requiring a separate fill light.
Named after Stanley McCandless (the godfather of modern lighting design), this method is particularly effective for small productions because it:
- Requires only two fixtures per area (instead of three)
- Creates natural-looking facial modeling
- Works beautifully for dialogue-heavy productions
- Provides built-in color variation through warm/cool contrast
I’ve used the McCandless Method for everything from intimate two-person plays to musical theater numbers, and it never disappoints.
Light Positioning: Understanding Angles and Their Emotional Impact
Where you place your lights matters just as much as what lights you use. Each position creates distinctly different effects and serves specific dramatic purposes[2][3].
Front Lighting: Clarity and Visibility
Purpose: Reveals performer faces, expressions, and details
Emotional Quality: Neutral, realistic, clear
Best For: Dialogue scenes, comedy, realistic drama
Angle: 45 degrees above audience sightline
Front lighting is your bread and butter for visibility. It’s flattering, clear, and ensures the audience can see facial expressions—critical for actors doing subtle emotional work.
Side Lighting: Movement and Texture
Purpose: Enhances body movement, reveals textures, creates dramatic shadows
Emotional Quality: Dynamic, energetic, sculptural
Best For: Dance, physical theater, dramatic confrontations
Angle: 90 degrees from performer (directly from the sides)
Side lighting is magical for movement-based work. It creates long shadows, emphasizes the three-dimensionality of the human body, and adds visual excitement. However, it can create harsh shadows on faces, so it’s typically combined with front light for scenes with important dialogue.
Backlighting: Depth and Separation
Purpose: Separates performers from background, creates depth, adds rim lighting
Emotional Quality: Dramatic, mysterious, ethereal
Best For: Silhouettes, dream sequences, creating visual depth
Angle: Directly behind and above performers
Backlighting is your secret weapon for creating professional-looking stage pictures. It prevents performers from “disappearing” into the background and adds that polished quality that separates amateur productions from professional ones[2][3].
Top Lighting: Special Effects
Purpose: Creates dramatic downlight, isolates performers
Emotional Quality: Intense, isolating, stark
Best For: Interrogation scenes, moments of revelation, musical theater “specials”
Angle: Directly overhead
Top lighting is dramatic and should be used sparingly. It creates deep eye sockets and can be unflattering, but when you need that “spotlight confession” moment, nothing else works quite as well.
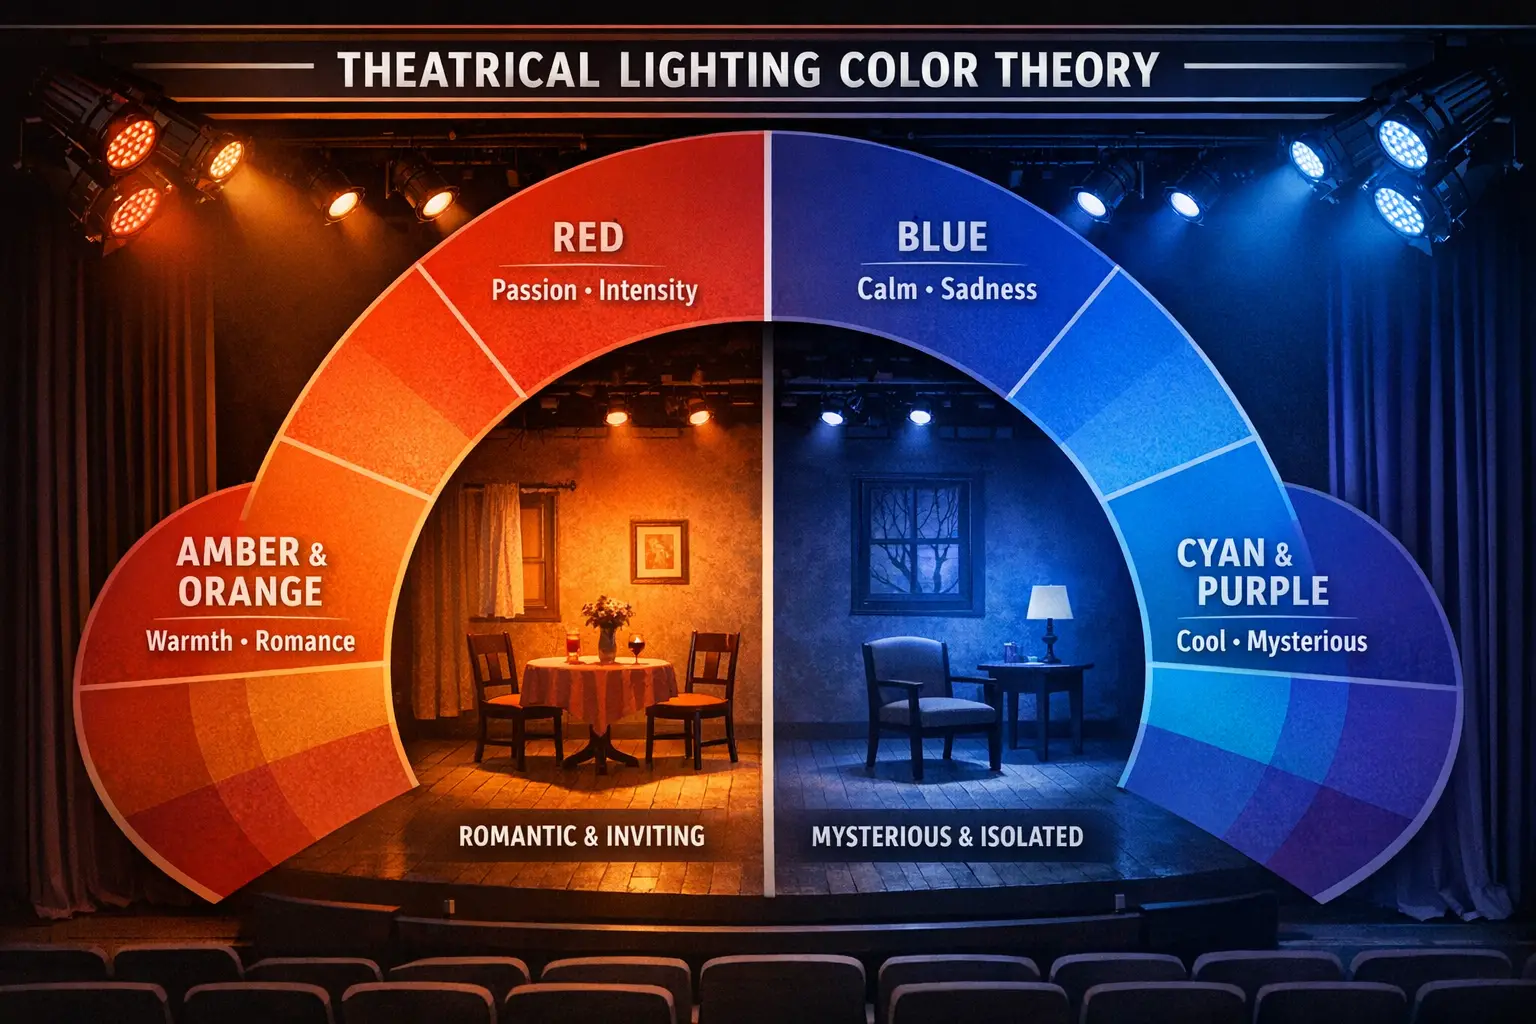
Color Theory for Theater: Creating Mood Without Breaking the Bank
This is where Lighting Design Fundamentals for Small Theater Productions: Creating Mood and Focus on a Limited Budget gets exciting. Color is the most powerful tool in your lighting arsenal, and with LED fixtures, it costs you absolutely nothing extra[1][2].
The Emotional Language of Color
Warm Colors (Reds, Ambers, Oranges, Light Yellows):
- 🔥 Energy and excitement
- ❤️ Romance and intimacy
- ☀️ Warmth and comfort
- 😊 Joy and optimism
- 🌅 Sunrise/sunset realism
Cool Colors (Blues, Cyans, Purples, Blue-Greens):
- 🌙 Mystery and suspense
- 😔 Isolation and sadness
- ❄️ Cold and distance
- 🌌 Night scenes and dreams
- 👻 Supernatural or surreal moments
Neutral Colors (White, Light Lavender, Pale Pink):
- 💡 Clarity and realism
- 🏢 Everyday scenes
- 📖 Narrative exposition
- 🎭 Versatile foundation
Practical Color Application
Here’s a technique I’ve used in dozens of productions: establish a color palette for your entire show based on the emotional journey. For example:
Production: A drama about family reconciliation
Act 1 (Conflict): Cool blues and cyans dominate, creating emotional distance
Act 2 (Breakthrough): Gradual introduction of ambers and warm tones
Act 3 (Resolution): Warm golden ambers suggest healing and connection
This creates a subtle emotional arc that audiences feel even if they don’t consciously notice it. And with LED color mixing, you’re simply programming different color combinations—no additional equipment needed[1][2].
Color Contrast for Focus
Want to direct audience attention without adding more fixtures? Use color contrast. When everything on stage is lit in blue except one area in warm amber, guess where every eye in the house goes? The warm area. It’s visual psychology, and it’s free.
Zone Lighting: Doing More With Less
Zone lighting—dividing your stage into distinct controllable areas—is the secret to making limited fixtures feel like a complete lighting system[1]. Instead of trying to light your entire stage uniformly (which requires many fixtures), you strategically control which zones are illuminated for each scene.
Creating a Zone Plan
For a typical small theater stage (20′ x 15′), consider this six-zone layout:
| Zone | Stage Position | Primary Use | Fixture Count |
|---|---|---|---|
| 1 | Downstage Left | Entrances, intimate scenes | 2-3 fixtures |
| 2 | Downstage Center | Major scenes, monologues | 3-4 fixtures |
| 3 | Downstage Right | Entrances, intimate scenes | 2-3 fixtures |
| 4 | Upstage Left | Background, secondary action | 1-2 fixtures |
| 5 | Upstage Center | Background, ensemble scenes | 2-3 fixtures |
| 6 | Upstage Right | Background, secondary action | 1-2 fixtures |
Total fixtures needed: 12-18 (well within budget range)
By controlling zones independently, you can:
- Isolate specific scenes or performers
- Create depth by lighting foreground brighter than background
- Transition between locations by changing which zones are active
- Focus attention precisely where the story demands
Scene-Based Zone Programming
Here’s a practical example from a production I lit in 2024:
Scene: Two-person argument (downstage center) while other characters observe (upstage)
Zone Programming:
- Zone 2 (Downstage Center): Full intensity, warm key light with cool fill
- Zones 4, 5, 6 (Upstage): 30% intensity, cool blue wash
- Zones 1, 3: Off
This simple zone control created clear focus on the arguing characters while maintaining visual context of the observers—all with the same fixtures used throughout the show, just controlled differently.
Intensity and Focus: The Forgotten Fundamentals
Intensity adjustments might be the most underutilized tool in small theater lighting[2]. You don’t always need more lights; sometimes you just need to make some lights brighter and others dimmer.
The Intensity Hierarchy
Think of your stage as having three levels of intensity at any given moment:
- Primary Focus (100% intensity): Where the main action occurs
- Secondary Context (30-50% intensity): Supporting areas that provide context
- Background (10-20% intensity or off): Minimal illumination or darkness
This hierarchy guides the audience’s eye naturally without them realizing they’re being directed. High-intensity light captures attention; low-intensity light creates softness or mystery[2].
Motivated Lighting: Realism on a Budget
Motivated lighting means replicating real-world light sources within your theatrical world[2]. It requires only thoughtful positioning rather than expensive specialized equipment:
- Window light: Cool blue-white from stage left suggests morning light through a window
- Fireplace: Warm amber flickering effect from floor level
- Street lamp: Single overhead light with warm color creating pool of illumination
- Moonlight: Cool blue backlight suggesting nighttime
- Practical fixtures: Actual lamps or candles on stage (battery-operated for safety)
Motivated lighting grounds your production in reality and gives your lighting choices dramatic justification. When a director asks, “Why is that light blue?” you can answer, “It’s moonlight coming through the window”—much more satisfying than “Because I thought it looked nice.”
Building Your Lighting Cues: From Concept to Execution
Understanding fundamentals is one thing; actually implementing them is another. Here’s the process I’ve refined over 30 years:
Step 1: Script Analysis
Read through your script and note:
- Time of day for each scene
- Emotional tone and shifts
- Specific lighting references in the text
- Moments requiring focus changes
- Scene transitions
Step 2: Conceptual Design
Work with your director to establish:
- Overall color palette
- Mood progression through the show
- Special effects or dramatic moments
- Budget and equipment limitations
Step 3: Zone and Fixture Planning
Create a simple plot showing:
- Which zones need coverage
- Fixture positions for three-point lighting
- Color assignments
- Special positions for specific moments
Step 4: Programming and Tech
During technical rehearsals:
- Build lighting cues scene by scene
- Adjust intensity levels for proper focus
- Fine-tune colors for desired mood
- Time transitions between cues
- Document everything (you’ll need it for future performances)
Step 5: Refinement
After seeing run-throughs:
- Adjust cues that don’t serve the story
- Fix visibility issues
- Enhance moments that need more impact
- Simplify overly complicated sequences
Advanced Techniques for Small Budgets
Once you’ve mastered the fundamentals, these advanced techniques add professional polish without additional cost:
Crossfading for Smooth Transitions
Instead of blackouts between scenes, crossfade from one lighting state to another. This maintains theatrical flow and feels more sophisticated. Most basic lighting boards support crossfading with adjustable timing.
Color Scrolling for Emotional Builds
Gradually shift colors during a scene to support emotional progression. For example, a confrontation scene might start in neutral white and slowly shift toward intense red as tensions escalate—all programmed as a slow cue rather than a sudden change.
Isolation Specials
Reserve one or two fixtures as “specials”—lights dedicated to specific moments rather than general coverage. A tight special on an actor delivering a crucial monologue creates instant focus and dramatic impact.
Gobo Projections (If Budget Allows)
Gobos (metal templates that create patterns) can suggest windows, trees, or abstract textures. While not essential, a few inexpensive gobos ($15-40 each) dramatically expand your visual vocabulary.
Practical Tips From Three Decades in the Theater
Let me share some hard-won wisdom that’ll save you headaches:
✅ Always have a backup plan – Fixtures fail, usually during performances. Know which fixtures can be redirected to cover critical areas.
✅ Less is more – Resist the temptation to use every color and effect available. Restraint creates sophistication.
✅ Collaborate early – Talk with your director, set designer, and costume designer before finalizing lighting plans. A costume that looks great in warm light might look terrible in cool blue.
✅ Document everything – Take photos of your lighting plots and keep detailed cue sheets. You’ll thank yourself when remounting the show or troubleshooting issues.
✅ Attend focus calls – If you’re an actor, volunteer to stand on stage during lighting focus sessions. You’ll learn more about lighting in two hours than reading could teach you in weeks.
✅ Safety first, artistry second – Never compromise safety for a lighting effect. Secure all fixtures, use safety cables, and follow electrical codes.
✅ Test before tech – Don’t discover equipment problems during your first technical rehearsal. Test everything days in advance.
Learning Resources and Continued Education
Understanding Lighting Design Fundamentals for Small Theater Productions: Creating Mood and Focus on a Limited Budget is an ongoing journey. In 2026, there are excellent learning opportunities available:
The Lighting Design Fundamentals course offered in-person in New York City (January 24 – April 13, 2026) provides instructor-led training from Broadway and ballet professionals[4][8]. While this represents an investment, learning directly from working professionals accelerates your understanding tremendously.
For those unable to attend in-person training, consider:
- Volunteer as a lighting assistant on local productions
- Watch lighting-focused theater and analyze choices
- Experiment during rehearsals when stakes are lower
- Join online theater tech communities for peer learning
- Read lighting plots from published plays
The best education combines theoretical knowledge with hands-on experience. Every production you light teaches you something new.
Common Mistakes to Avoid
Let’s talk about the pitfalls I see repeatedly (and have fallen into myself):
❌ Overlighting – More light doesn’t equal better lighting. Darkness creates contrast and focus.
❌ Ignoring color temperature – Mixing cool white LEDs with warm incandescent creates muddy, unflattering light.
❌ Forgetting the audience perspective – What looks great from backstage might create glare or shadows from the house. Always check sightlines.
❌ Static lighting – Lighting should evolve with the story, not remain unchanged for entire acts.
❌ Neglecting faces – No matter how artistic your concept, if the audience can’t see actors’ faces during important moments, you’ve failed.
❌ Skipping safety protocols – Seriously, use those safety cables. Every. Single. Time.
Working With What You Have
Sometimes you’re truly limited—maybe you’re working with house lights and two LED PARs borrowed from a friend. Even with severe constraints, you can apply these fundamentals:
- Use the two fixtures for three-point lighting on your primary performance area
- Employ motivated lighting to justify why only part of the stage is lit
- Maximize color contrast to create visual interest
- Control intensity carefully to direct focus
- Stage blocking to keep actors in lit areas
I’ve seen brilliant work done with minimal equipment because the designer understood fundamentals and worked creatively within constraints. Limitations often spark innovation.
The Actor’s Perspective: Using Lighting to Enhance Performance
As actors, understanding lighting helps you:
Find Your Light – Knowing where fixtures are positioned helps you find optimal positioning for visibility without looking like you’re hunting for your mark.
Use Light Emotionally – Step into a pool of warm light for a moment of hope; move into shadow for introspection. These physical choices amplify your performance.
Communicate With Designers – Speaking the language of lighting helps you articulate what you need: “Could I have a bit more fill light stage left? I’m getting lost in shadow during my monologue.”
Respect the Design – Understanding the thought behind lighting choices helps you work with the design rather than against it.
Conclusion: Light as Your Storytelling Partner
After 30 years of working under every kind of lighting—from sophisticated Broadway rigs to a single work light during a blackout performance—I can tell you with absolute certainty that Lighting Design Fundamentals for Small Theater Productions: Creating Mood and Focus on a Limited Budget isn’t about equipment; it’s about understanding.
When you grasp how color creates emotion, how position shapes perception, how intensity directs focus, and how simple three-point lighting creates professional results, you’re equipped to create compelling theatrical lighting regardless of budget constraints.
The fundamentals we’ve covered—LED fixtures for cost efficiency[1][2], three-point lighting configuration[2], strategic color theory[1][2], zone lighting for maximum impact[1], and thoughtful positioning[2][3]—provide everything you need to light professional-quality small theater productions.
Your Next Steps
- Assess your current resources – What fixtures and control equipment do you have access to?
- Start with three-point lighting – Master this foundation before attempting complex designs
- Experiment with color – If you have LED fixtures, spend time exploring color combinations and their emotional impact
- Analyze professional work – Attend theater and consciously observe lighting choices
- Volunteer or assist – Hands-on experience accelerates learning exponentially
- Document your work – Keep records of what works and what doesn’t
- Invest strategically – When budget allows, prioritize LED fixtures over quantity of traditional fixtures
Remember, every Broadway lighting designer started exactly where you are now—learning fundamentals, making mistakes, and gradually developing their eye and instincts. The difference between amateur and professional lighting isn’t budget; it’s understanding these core principles and applying them thoughtfully.
Now get out there and create some magic. Your performers are counting on you to make them look good, your story deserves lighting that serves it, and your audience is waiting to be transported. You’ve got this. 🎭✨
References
[1] Essential Professional Stage Lighting Equipment 2026 Guide – https://www.vellolight.com/blog/essential-professional-stage-lighting-equipment-2026-guide/
[2] Stage Lighting Beginners Guide – https://shehds.com/blogs/news/stage-lighting-beginners-guide
[3] Stage Lighting Guide – https://rclite.com/blog/stage-lighting-guide/
[4] Lighting Design Fundamentals 2 – https://studioschoolofdesign.org/courses/lighting-design-fundamentals-2/
[8] Upcoming Lighting Audio And Rigging Training – https://www.livedesignonline.com/news/upcoming-lighting-audio-and-rigging-training