

Listen, after three decades of standing in front of cameras—from cramped commercial studios to sprawling theatre sets—I can tell you this with absolute certainty: the difference between a self-tape that gets you in the room and one that gets deleted isn’t always about your acting chops. Sometimes it’s about whether you understand the technical language of the camera itself. In 2026’s lightning-fast digital casting pipeline, where casting directors are reviewing hundreds of submissions daily, mastering Advanced Camera Literacy Drills: Framing, Eye Lines, and Subtle Adjustments for Professional Self-Tapes isn’t just helpful—it’s essential.
Think of it this way: you wouldn’t show up to a Broadway audition without knowing how to project to the back row, right? Well, the camera has its own set of rules, and ignoring them is like whispering your monologue in a 2,000-seat theatre. The good news? These technical skills are completely learnable, and once you’ve got them down, they become second nature—like muscle memory for your creative toolkit.
Key Takeaways
- 📐 Master medium close-up framing from mid-chest to just above your head to showcase both facial expressions and body language effectively
- 👁️ Perfect off-camera eye lines by positioning your gaze slightly left or right of the lens, never directly into it (unless specifically directed)
- 💡 Control your lighting setup using three-point lighting or natural window light to create professional depth and avoid distracting shadows
- ⏱️ Prioritize preparation over filming time—spend 30-40 minutes on scene work and only 20-30 minutes capturing 3-5 polished takes
- 🎯 Submit strategically different takes that demonstrate distinct character choices rather than minor variations of the same performance
Understanding the Technical Foundation of Advanced Camera Literacy Drills: Framing, Eye Lines, and Subtle Adjustments for Professional Self-Tapes
Before we dive into the drills themselves, let’s establish what camera literacy actually means in practical terms. It’s the ability to understand how the camera “sees” you—which is fundamentally different from how a live audience or even a casting director sitting across a table experiences your performance.
Why Camera Literacy Matters More Than Ever in 2026
The self-tape revolution didn’t just change where auditions happen; it changed the entire evaluation process. Casting directors in 2026 are drowning in submissions. They’re making snap judgments based on technical quality before they even assess your acting. A poorly framed, badly lit tape with wonky eye lines? That’s getting the boot in the first ten seconds, regardless of how brilliant your character work is.
I learned this the hard way early in my career when I submitted what I thought was a killer audition for a national commercial—only to find out later that my tape was rejected because I’d filmed it vertically on my phone. The casting director never even watched my performance. Ouch.
The Framing Fundamentals: Your Visual Vocabulary
Let’s start with the foundation: framing. This is where most actors—even experienced ones—leave opportunity on the table.
The Medium Close-Up: Your Self-Tape Sweet Spot
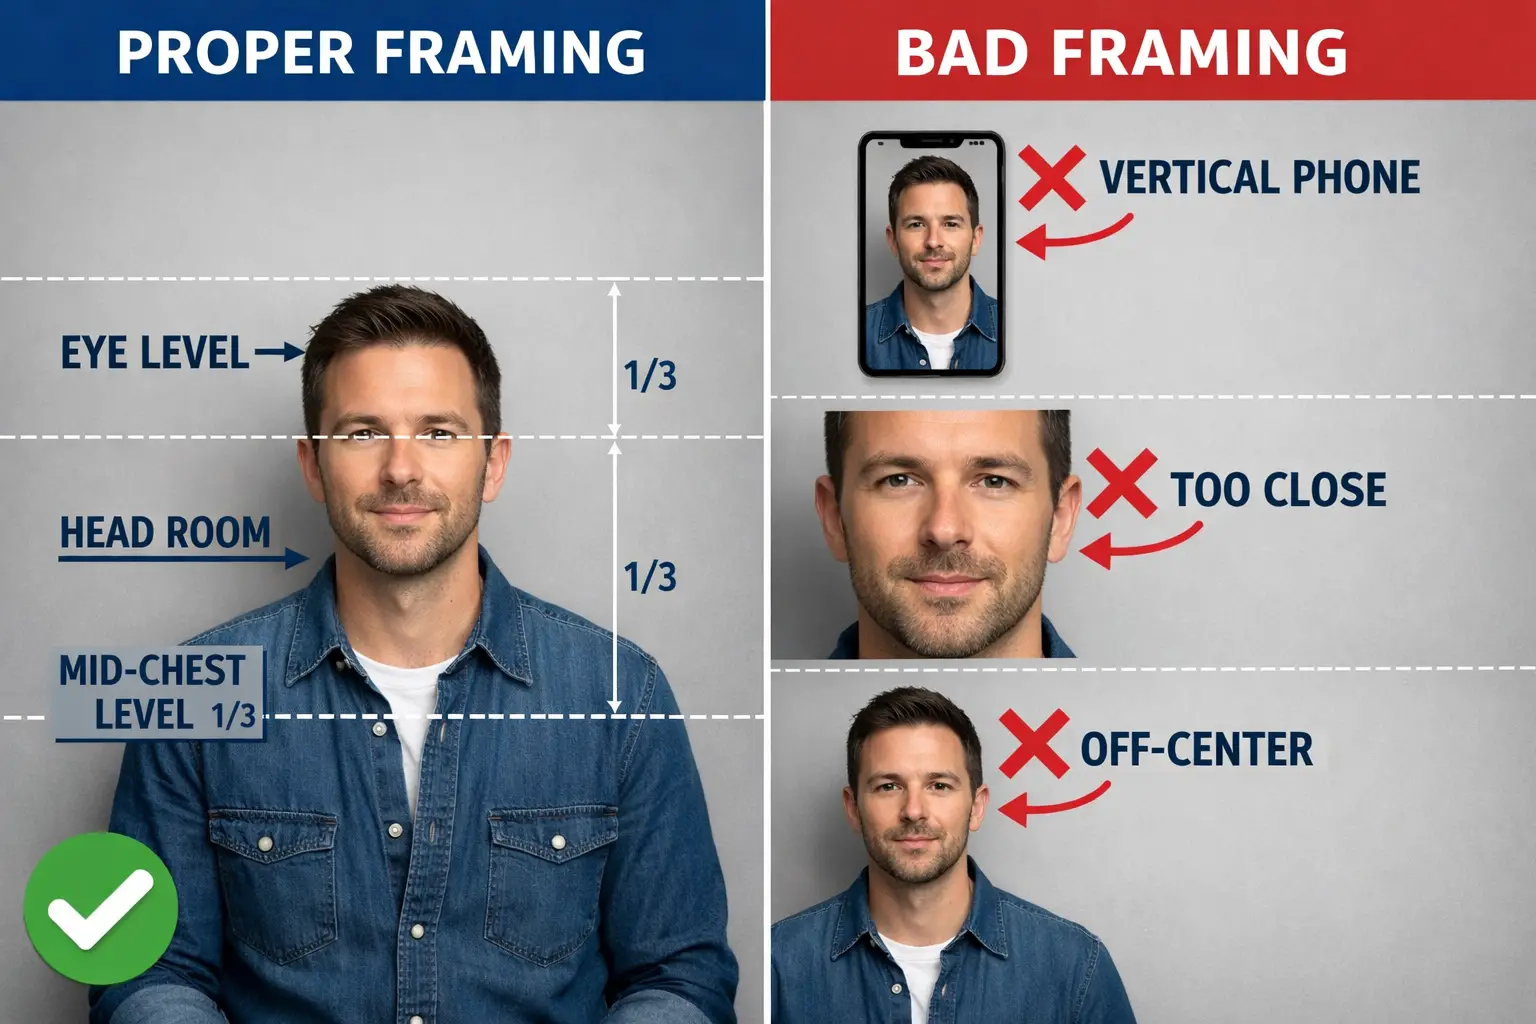
The industry standard for self-tapes is the medium close-up (MCU). This means framing yourself from mid-chest to just above the top of your head[1][2]. Why this specific frame? Because it gives casting directors the perfect balance: they can read every micro-expression on your face while still seeing enough of your shoulders and torso to catch your physical energy and body language.
Here’s your first drill:
The Frame Check Exercise ⚡
- Set up your camera at eye level
- Position yourself in the medium close-up frame
- Mark the floor with tape where your feet should be
- Film a 30-second improvisation while staying in frame
- Review the footage—did you drift out of frame? Did you bob up and down?
- Repeat until you can maintain perfect framing without thinking about it
Think of this like a dancer learning to stay on their mark. Eventually, your body just knows where it needs to be.
The 2/3 Rule: Advanced Compositional Balance
Once you’ve mastered center framing (which I recommend for beginners), you can level up with the 2/3 rule[3]. This technique involves positioning yourself in the left or right third of the frame rather than dead center. It creates a more cinematic, professional look and gives the composition visual interest.
| Framing Position | Best Used For | Visual Effect |
|---|---|---|
| Center Frame | Standard auditions, commercial work | Direct, accessible, safe |
| Left Third | Dramatic scenes, contemplative moments | Creates visual space, cinematic |
| Right Third | Dynamic characters, energetic scenes | Asymmetrical interest, modern |
Important caveat: Always check the casting director’s instructions. If they want center framing, give them center framing. Camera literacy includes knowing when to follow the rules and when you have creative license.
Landscape Orientation: The Non-Negotiable Rule
This should go without saying in 2026, but I still see it: always film in landscape (horizontal) mode[2]. Vertical videos are completely unsuitable for professional casting platforms. They scream amateur hour louder than anything else you could do wrong.
Your phone wants to be held vertically—that’s how we use it 90% of the time. But for self-tapes, you need to retrain that instinct. Mount your phone horizontally on a tripod every single time.
Mastering Eye Lines: The Secret Language of Camera Work
If framing is your visual vocabulary, eye lines are your grammar. Get them wrong, and even perfect framing won’t save you.
The Golden Rule: Never Look at the Lens (Unless Told Otherwise)
Here’s something that trips up theatre actors constantly: you should never look directly at the camera lens unless the script explicitly tells you to break the fourth wall[1][2][3]. On stage, you’re trained to “find” the audience with your eyes, to include them. On camera, looking at the lens feels like you’re staring into someone’s soul—and not in a good way. It’s uncomfortable and breaks the cinematic illusion.
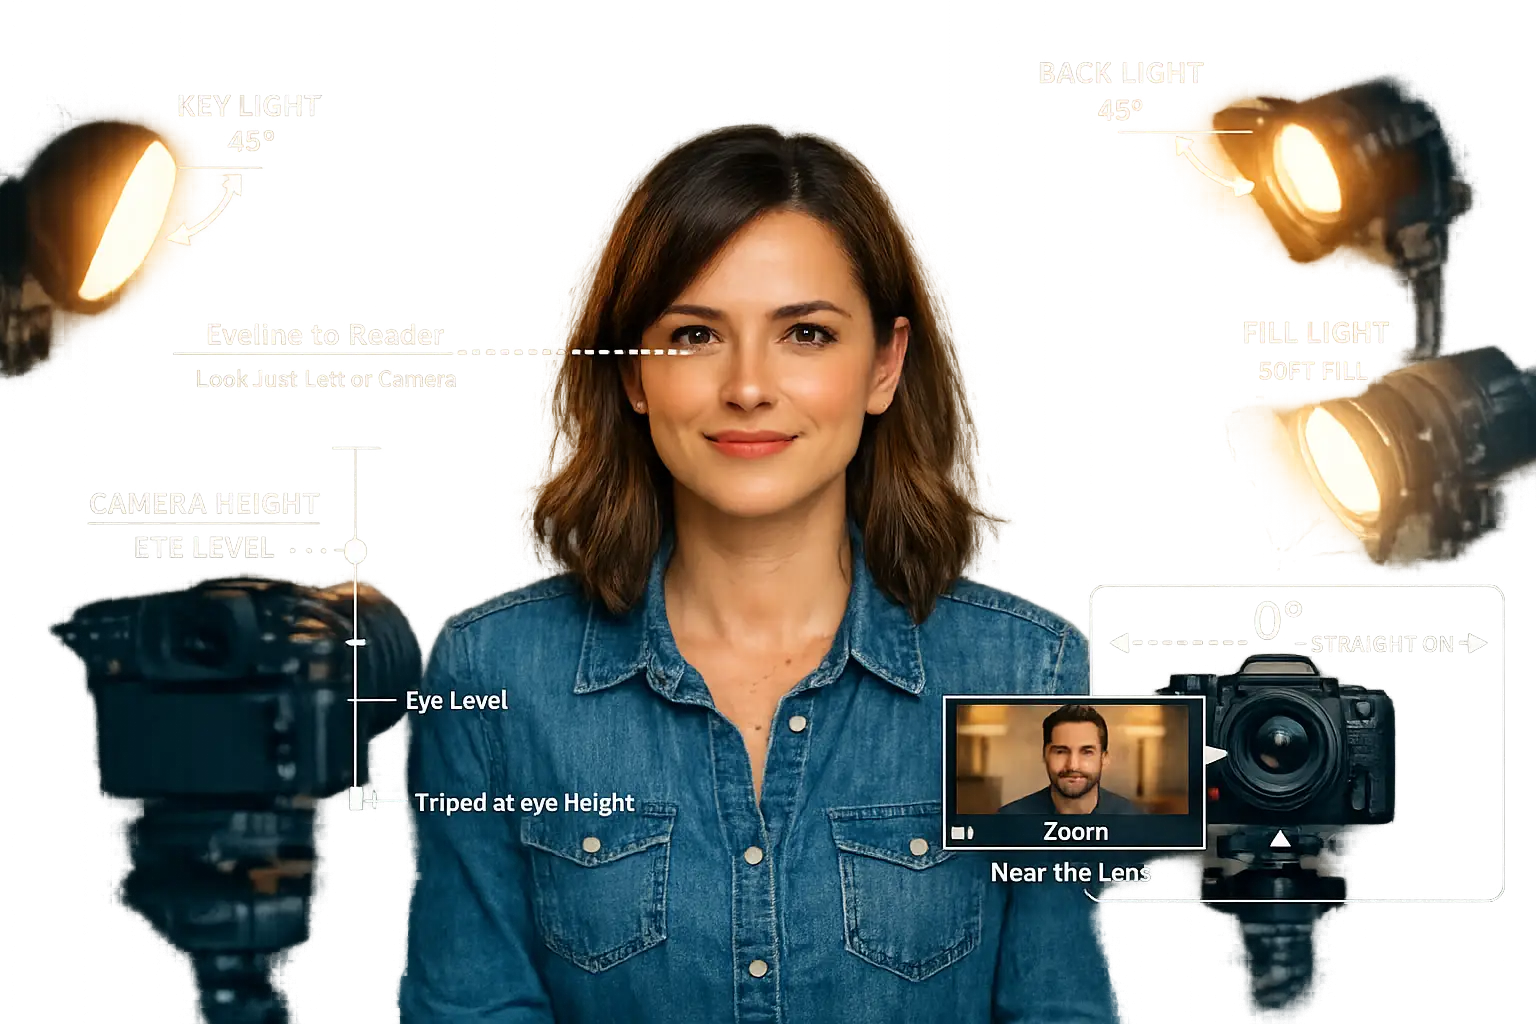
Instead, position your gaze slightly to the left or right of the lens. This creates the illusion that you’re talking to a real person in the scene with you.
The Eye Line Positioning Drill
Virtual Reader Eye Line Exercise 👁️
- Position your camera at the exact eye level of your scene partner (real or imagined)
- If using a virtual reader on Zoom or Skype, position their screen window as close to the camera lens as possible while still being able to see their face[3]
- Mark a small piece of colored tape just to the left or right of your lens as your eye line target
- Practice a monologue while maintaining focus on that mark
- Review footage—does it look like you’re talking to someone, or does your gaze wander?
- Adjust and repeat
Pro tip from the trenches: I use a small photo of the character I’m imagining (or even the actor I might be playing opposite) taped right next to my lens. It helps me connect emotionally while maintaining the proper technical eye line.
Camera Height: The Detail That Changes Everything
Your camera must be positioned at the eye level of your scene partner[3]. If you’re talking to someone taller, the camera goes higher. Someone shorter? Lower the camera. A child? Camera goes way down.
This seems nitpicky until you see the difference in the footage. Incorrect camera height makes your eye lines look off, like you’re talking to someone’s forehead or chest instead of their eyes. It’s subtle, but casting directors notice.
The Height Adjustment Drill:
Run the same scene three times with three different camera heights:
- Too high (looking up)
- Correct (eye level with scene partner)
- Too low (looking down)
Watch all three back-to-back. The difference will be immediately obvious, and you’ll never forget to check camera height again.
Subtle Adjustments: The Professional Polish That Sets You Apart
Now we’re getting into the advanced territory—the subtle adjustments that separate working professionals from talented amateurs. These are the micro-choices that demonstrate you understand the medium.
Lighting: Creating Depth and Dimension
Proper lighting isn’t just about being visible; it’s about creating a professional, three-dimensional image that draws the eye and flatters your features.
The Three-Point Lighting Setup 💡
The gold standard is three-point lighting[1]:
- Key Light (brightest): Positioned at 45 degrees to your face, this is your main light source
- Fill Light (softer): Positioned opposite the key light to reduce harsh shadows
- Back Light (separation): Positioned between you and your backdrop to create depth and separate you from the background
Don’t have professional lights? No problem. A window provides beautiful, soft natural light. Position yourself facing the window for even illumination that naturally fills shadows[2][3]. Side window lighting adds gorgeous cinematic depth.
Critical warning: Never position yourself with a window or bright light behind you. This creates silhouetting and obscures the facial features that casting directors need to see[2].
The Lighting Quality Drill
Natural Light Mapping Exercise:
- Film yourself in the same spot at different times of day
- Note how the light quality changes (harsh midday vs. soft morning/evening)
- Identify your “golden hour” for the best natural light
- Create a lighting schedule for your self-tape setup
I film 90% of my self-tapes between 9-11 AM when the light through my north-facing window is absolutely perfect. Knowing your space’s lighting patterns is camera literacy in action.
Background Selection: The Unsung Hero
Your backdrop should be neutral and flat-colored—grey, blue, or off-white walls work perfectly[2]. Avoid busy wallpapers, posters, family photos, or anything that competes for attention with your performance.
Think of it this way: you’re not the only actor being considered. Casting directors are watching dozens, maybe hundreds of tapes. A distracting background makes their job harder and takes focus away from you. Don’t make them work harder than necessary.
Advanced Camera Literacy Drills: Framing, Eye Lines, and Subtle Adjustments for Professional Self-Tapes in Practice
Let’s put this all together with comprehensive drills that integrate everything we’ve covered.
The Complete Technical Checklist
Before you hit record on any self-tape in 2026, run through this checklist:
✅ Framing Check
- Medium close-up (mid-chest to just above head)
- Landscape orientation
- Center or 2/3 rule positioning (as appropriate)
✅ Eye Line Verification
- Camera at scene partner’s eye level
- Gaze positioned left or right of lens (not into it)
- Virtual reader screen near lens (if applicable)
✅ Lighting Confirmation
- Three-point lighting or quality natural light
- No backlighting or silhouetting
- Face evenly illuminated with soft shadows
✅ Background Inspection
- Neutral, flat-colored backdrop
- No distracting elements
- Proper separation from background
✅ Audio Quality
- Clear, clean sound
- No echo or background noise
- Proper recording levels
The Preparation-to-Filming Ratio
Here’s a game-changing insight that took me years to learn: spend 30-40 minutes on scene preparation and refinement, but only 20-30 minutes actually filming[3]. This ratio ensures you’re capturing polished takes in just 3-5 attempts rather than burning yourself out with 20+ takes that all blur together.
The Efficient Self-Tape Workflow:
Phase 1: Preparation (30-40 minutes)
- Script analysis and character work
- Blocking decisions and physical choices
- Technical setup (camera, lighting, backdrop)
- Eye line and framing checks
- Rehearsal with reader (if available)
Phase 2: Filming (20-30 minutes)
- Take 1: First pass (usually a warm-up)
- Take 2: Incorporate adjustments
- Take 3: Different emotional approach
- Take 4-5: Refinements and alternatives (only if needed)
Phase 3: Review and Submit (10-15 minutes)
- Watch all takes
- Select best one or two with noticeable differences[3]
- Basic editing (slate, scene assembly)
- Upload and submit
The Two-Take Strategy
If you’re submitting multiple takes, make sure they demonstrate distinctly different character choices or emotional approaches[3], not just minor variations. Casting directors want to see your range and your ability to make bold choices, not watch the same performance with slightly different hand gestures.
The Contrast Drill:
Record the same scene twice with these parameters:
- Take 1: One clear emotional choice (e.g., anger-driven)
- Take 2: Opposite or contrasting choice (e.g., sadness-driven)
- Watch both—can you immediately identify the difference?
- If not, your choices aren’t bold enough
Performance Tweaks: The Micro-Adjustments That Matter
Beyond the technical setup, there are performance-specific adjustments that demonstrate advanced camera literacy.
Energy Calibration for the Lens
The camera requires less physical energy than stage work but more emotional specificity. Think of it as “thinking louder” rather than “acting bigger.” The camera catches every micro-expression, every thought behind your eyes.
The Calibration Exercise:
- Perform a monologue at full stage energy (big gestures, projected voice)
- Reduce physical energy by 50% while maintaining emotional intensity
- Reduce by another 25% (now at 25% of stage energy)
- Film all three versions
- Watch back—the 25% version usually looks most natural on camera
This doesn’t mean being flat or low-energy. It means channeling your energy into facial expressions, eye work, and subtle physical choices rather than broad gestures.
Blocking for Camera: Working Within Your Frame
Unlike stage blocking where you move through space, camera blocking is about working effectively within your established frame. You’ve marked your spot; now you need to make dynamic choices within that limited space.
Effective Camera Blocking Techniques:
- Depth movement: Lean slightly toward or away from camera
- Lateral shifts: Small side-to-side movements within frame
- Head tilts and turns: Create visual interest without leaving frame
- Hand gestures: Keep them within the medium close-up frame
The Blocking Constraint Drill:
Perform a scene while staying completely within your marked frame. Challenge yourself to make the performance visually dynamic using only:
- Depth changes (forward/back leans)
- Head positions and angles
- Upper body movements
- Facial expressions and eye work
This constraint forces you to find subtlety and nuance—exactly what the camera loves.
Troubleshooting Common Camera Literacy Mistakes
Even with all this knowledge, we all make mistakes. Here are the most common ones I see (and have made myself):
Mistake #1: The Wandering Eye Line
Problem: Your eyes drift around, searching for focus Solution: Use a physical marker (tape, photo, or reader) and commit to it
Mistake #2: The Bobbing Head
Problem: You unconsciously move up and down, drifting in and out of frame Solution: Practice the Frame Check Exercise until muscle memory kicks in
Mistake #3: The Overlit Face
Problem: Too much light creates harsh shadows and washes out features Solution: Diffuse your lights with white fabric or use softer natural light
Mistake #4: The Dead Space Background
Problem: Too much empty space above your head or around you Solution: Adjust camera height and position to fill frame appropriately
Mistake #5: The Audio Afterthought
Problem: Great visuals but echo-y, unclear sound Solution: Record in a smaller room with soft furnishings; use an external mic if possible
Building Your Self-Tape Practice Routine
Camera literacy, like any skill, requires consistent practice. Here’s a weekly routine that will transform your technical abilities:
Monday: Framing drills (15 minutes)
- Set up and film yourself in various frame positions
- Practice staying in frame during movement
Wednesday: Eye line and camera height work (20 minutes)
- Practice with virtual reader positioning
- Film scenes with different camera heights
Friday: Lighting experiments (20 minutes)
- Try different lighting setups
- Map your space’s natural light at different times
Weekend: Full self-tape simulation (60 minutes)
- Complete the entire workflow from prep to submission
- Review and identify areas for improvement
The Competitive Edge: Why This Matters in 2026

Let’s be real: the competition is fierce. Every actor with a smartphone can submit a self-tape now. But that doesn’t mean every actor understands how to use that smartphone effectively.
When you master Advanced Camera Literacy Drills: Framing, Eye Lines, and Subtle Adjustments for Professional Self-Tapes, you’re not just improving your technical quality—you’re demonstrating professionalism, attention to detail, and respect for the casting process. These qualities get noticed.
I can’t count how many times I’ve heard casting directors say, “We could tell they knew what they were doing just from the first frame.” That’s the power of camera literacy. It signals that you’re a professional who takes the craft seriously.
Conclusion: Your Action Plan for Camera Mastery
After 30 years in this business, I’ve learned that success comes from mastering the fundamentals while everyone else is chasing shortcuts. Camera literacy isn’t glamorous—it’s not the fun part of acting. But it’s absolutely essential in 2026’s digital-first casting landscape.
Your Next Steps:
This Week: Set up your self-tape space and run through the complete technical checklist. Take photos of your setup for reference.
This Month: Complete all four weekly practice drills at least twice. Build the muscle memory.
Ongoing: Before every self-tape submission, review this article’s key points. Make camera literacy your competitive advantage.
Right Now: Film a 60-second monologue using everything you’ve learned here. Watch it back critically. Identify one specific area to improve, then film it again.
Remember, every working actor you admire had to learn this stuff too. The difference between them and everyone else? They actually did the work. They practiced the drills. They made the subtle adjustments.
The camera is just another scene partner—one with very specific needs and preferences. Learn its language, respect its requirements, and it’ll make you look like a star. 🌟
Now get out there and start drilling. Your breakthrough role is waiting for someone who understands not just how to act, but how to act for camera. Make sure that someone is you.
References
[1] How To Create A Self Tape – https://www.torontofilmschool.ca/blog/how-to-create-a-self-tape/
[2] Self Tape Guide For Actors – https://www.stageonetalent.co.uk/self-tape-guide-for-actors/
[3] The Art Of Self Tape – https://www.heidimarshall.com/the-art-of-self-tape/
[4] Qrmg7ja7chk – https://www.youtube.com/shorts/QRMG7Ja7cHk