
Standing on stage for the first time, many beginning actors make the same critical mistake: they shout to be heard. The result? A strained voice, poor vocal quality, and an exhausted performer before the first act ends. Voice and Movement Basics for Theater Beginners: Projection Without Shouting represents the foundation of professional stage performance—the ability to fill a theater with your voice while maintaining clarity, control, and vocal health. This comprehensive guide provides exercises for breath control, articulation, and stage blocking to command audiences confidently, tailored specifically for first rehearsals and performances.
Key Takeaways
- ✅ Diaphragmatic breathing forms the foundation of all vocal projection, allowing actors to generate power without straining their throat or vocal cords[1][2]
- ✅ Proper posture and core engagement create the physical framework necessary for sustained, powerful projection throughout long performances[3]
- ✅ Visualization techniques like the Rainbow Projection exercise help actors achieve distance and clarity without resorting to shouting[1][2]
- ✅ Daily practice of at least 30 minutes including warm-ups, breath work, and articulation exercises is essential for developing professional-level projection skills[4]
- ✅ Resonance placement and articulation work together to create commanding stage presence while using breath efficiently and preventing vocal fatigue[4][6]
Understanding the Foundation: Why Projection Isn’t Shouting
The difference between projection and shouting lies in technique, not volume. When actors shout, they force air through tightened vocal cords, creating tension in the throat and producing a harsh, unpleasant sound that fatigues quickly. In contrast, proper projection uses the entire body as an instrument, channeling breath support through relaxed vocal mechanisms to create a resonant, carrying sound.
Vocal projection means speaking to be heard clearly by every audience member, from the front row to the back balcony[4]. This requires understanding how sound travels, how the human voice produces tone, and how the body supports vocal production. For theater beginners entering their first rehearsals, mastering these fundamentals prevents the vocal damage that plagues untrained performers.
The Science Behind Vocal Projection
The human voice operates through three interconnected systems:
- Respiration: The power source (lungs and diaphragm)
- Phonation: The sound generator (vocal cords)
- Resonance: The amplifier (chest, throat, mouth, and nasal cavities)
When these systems work in harmony with proper technique, the voice projects effortlessly across large spaces. Body tension directly affects voice quality[4], which explains why relaxed, well-aligned posture produces better results than forcing volume through a tense body.
“The key to projection is not pushing harder, but breathing smarter and using your entire body as a resonating chamber.”
Mastering Diaphragmatic Breathing: The Power Source
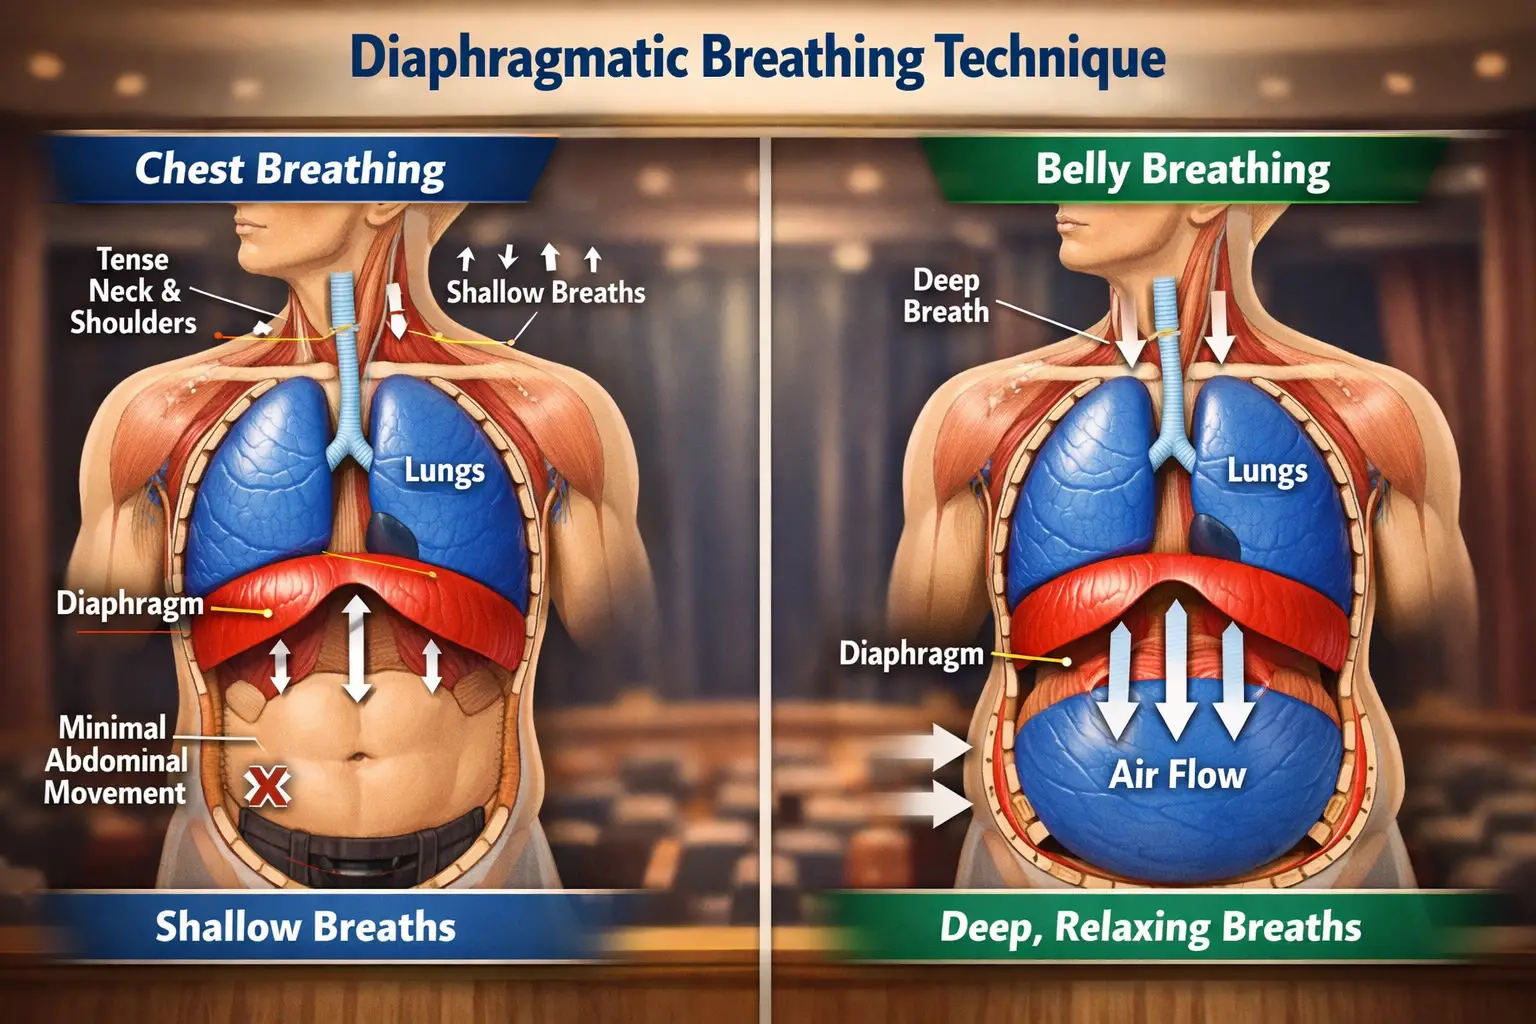
Diaphragmatic breathing serves as the first essential step for voice projection[1][2][4]. This breathing technique involves engaging the diaphragm—a dome-shaped muscle below the lungs—to draw air deep into the lower lungs rather than taking shallow chest breaths.
How to Practice Diaphragmatic Breathing
Follow these steps to develop proper breath support:
Step 1: Find Your Diaphragm
- Place one hand on your chest and one on your abdomen
- Breathe naturally and observe which hand moves more
- Proper diaphragmatic breathing moves the abdomen, not the chest
Step 2: Practice the Technique
- Lie on your back with knees bent
- Place a book on your abdomen
- Inhale slowly through your nose, watching the book rise
- Exhale slowly through your mouth, watching the book fall
- The chest should remain relatively still
Step 3: Transfer to Standing
- Stand with feet shoulder-width apart
- Place hands on lower ribs and abdomen
- Breathe so your abdomen rises and falls rather than your chest[1]
- Feel your ribs expand outward and your back expand
The “Ha” Exercise for Building Projection Power
This foundational exercise trains your voice to travel far without straining[2]:
- Take a big breath, expanding your lungs down and abdomen out
- Force all that air out on a sharp “HA!” sound
- Feel the engagement of your core muscles supporting the sound
- Repeat 10 times, gradually increasing the distance you imagine the sound traveling
The “ha” exercise builds the muscle memory necessary for sustained projection during performance. Practice this daily, and you’ll notice increased vocal power without throat strain.
Breath Volume Awareness
Rather than increasing intensity, determine exactly how much air you need to be heard in your specific space and practice that precise amount[2]. This improves projection without strain or vocal fatigue. During rehearsals, experiment with different breath volumes:
- Small studio: Moderate breath support
- Medium theater: Increased breath capacity
- Large auditorium: Maximum breath support with full diaphragmatic engagement
Building Physical Foundation: Posture and Core Engagement
Proper posture forms the foundation of projection, and engaging your core muscles acts as a silent supporter for vocal power[3]. The body’s alignment directly impacts how efficiently breath supports the voice and how freely sound resonates.
The Ideal Projection Posture
Achieving optimal alignment involves several key elements:
| Body Part | Correct Position | Why It Matters |
|---|---|---|
| Feet | Shoulder-width apart, weight balanced | Provides stable foundation |
| Knees | Slightly bent, not locked | Allows flexibility and prevents tension |
| Pelvis | Neutral position, not tilted | Supports proper spinal alignment |
| Spine | Lengthened, natural curves maintained | Creates space for breath and resonance |
| Shoulders | Relaxed, down and back | Prevents upper body tension |
| Head | Balanced on spine, chin parallel to floor | Keeps throat open and relaxed |
| Jaw | Relaxed, not clenched | Allows free resonance |
Core Engagement Exercises
Strong core muscles support sustained projection throughout long performances. Try these exercises:
Exercise 1: The Plank Hold
- Hold a plank position for 30-60 seconds
- Breathe steadily while maintaining core engagement
- This builds the stamina needed for extended vocal work
Exercise 2: The Pelvic Tilt
- Stand against a wall
- Tilt pelvis to flatten lower back against wall
- Hold for 10 seconds while breathing
- Release and repeat 10 times
Exercise 3: The Core Connection
- Place hands on lower abdomen
- Cough gently and feel muscles engage
- Maintain that gentle engagement while speaking
- This is the core support needed for projection
Movement and Blocking Fundamentals
Understanding Voice and Movement Basics for Theater Beginners: Projection Without Shouting requires integrating vocal technique with stage movement. Actors must maintain projection while executing blocking—the planned movement and positioning on stage.
Key principles for maintaining projection during movement:
- 🎭 Breathe before moving: Take a breath before crossing the stage to maintain support
- 🎭 Keep the core engaged: Maintain gentle core activation during all movement
- 🎭 Face the audience: When possible, keep your face visible to project forward
- 🎭 Use the space: Larger movements require more breath support to maintain vocal consistency
- 🎭 Practice transitions: Rehearse speaking while moving until it becomes natural
Visualization Techniques for Controlled Projection
Actors should visualize sending their sound to a specific point (like a wall or spot across the room) rather than shouting, which helps achieve clarity and distance without vocal strain[2][4]. These mental techniques transform abstract concepts into concrete actions.
The Rainbow Projection Exercise
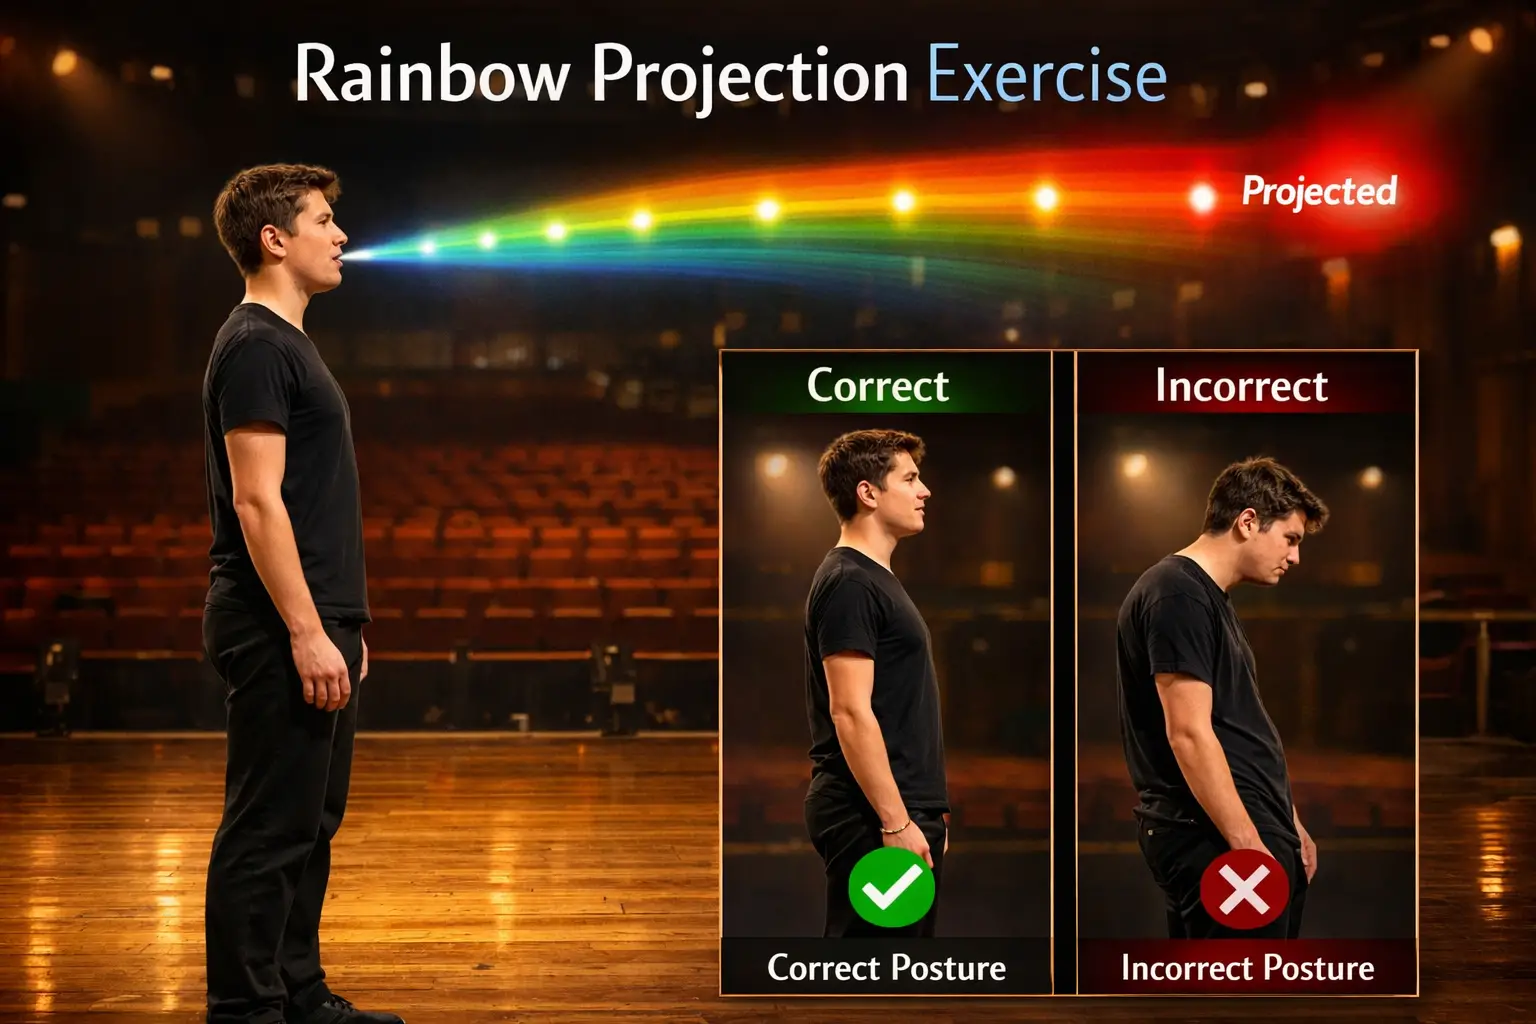
This visualization involves imagining a rainbow across the room and gradually increasing volume as your voice travels across it, teaching modulation and power without strain[1]:
Step-by-Step Rainbow Projection:
- Stand center stage in proper posture
- Visualize a rainbow arcing from your mouth to the back wall
- Start softly at the near end of the rainbow (close to you)
- Gradually increase volume as you imagine your voice traveling along the rainbow
- Reach full projection as your voice “lands” at the far wall
- Reverse the process, bringing volume back down
This exercise develops:
- Volume control and modulation
- Awareness of projection distance
- Smooth transitions between vocal levels
- Mental connection between intention and sound
The Target Point Method
Choose specific visual targets in the rehearsal or performance space:
- Near target: Front row center seat
- Medium target: Middle section exit sign
- Far target: Back wall clock or architectural detail
Practice delivering lines to each target, adjusting breath support and resonance accordingly. When projecting correctly in a room, you should hear a small amount of reverberation as sound bounces off walls; if absent, try projecting “through” the wall to the space beyond[4].
The Laser Beam Visualization
Imagine your voice as a laser beam of sound:
- The beam originates from your core
- It travels through your open throat
- It focuses through your mouth
- It extends in a straight line to your target
This visualization prevents the common mistake of “pushing” sound from the throat, instead encouraging full-body support.
Resonance Placement: Finding Your Natural Amplifier
Training involves finding forward resonance (chest and mask areas) rather than throat tension, which creates a more commanding presence and uses breath more efficiently[6]. Resonance placement determines the quality, richness, and carrying power of your voice.
Understanding Resonance Areas
The human body contains several resonating chambers:
Chest Resonance 💪
- Creates warmth and authority
- Feels like vibration in the sternum
- Ideal for powerful, grounded characters
Mask Resonance 🎭
- Creates clarity and projection
- Feels like vibration in the face, nose, and forehead
- Carries well across large spaces
Head Resonance 🧠
- Creates brightness and height
- Feels like vibration in the skull
- Useful for certain character choices
Exercises for Developing Forward Resonance
Exercise 1: The Hum Test
- Hum gently with lips closed
- Feel where the vibration occurs
- Place fingers on your face to detect resonance
- Aim for vibration in the mask (face/nose area)
Exercise 2: The “Ng” Sound
- Make the sound “ng” (as in “sing”)
- Hold it and feel the forward placement
- This naturally creates mask resonance
- Transition from “ng” to vowel sounds while maintaining placement
Exercise 3: The Siren Slide
- Start on a comfortable low note
- Slide up to a high note on “oo” or “ee”
- Feel the resonance shift from chest to head
- Practice controlling where resonance sits
Avoiding Throat Tension
The most common mistake beginners make is creating sound primarily in the throat, which leads to:
- ❌ Vocal fatigue and strain
- ❌ Limited volume and projection
- ❌ Harsh, unpleasant tone quality
- ❌ Potential vocal damage over time
Instead, focus on relaxed throat production:
- ✅ Yawn to feel an open throat
- ✅ Keep jaw loose and mobile
- ✅ Imagine swallowing space
- ✅ Let sound resonate forward, not get stuck in the throat
Articulation: The Clarity Component of Projection
Vocal projection means speaking to be heard, while articulation refers to clear physical production of words—both are essential for audience comprehension and connection[4]. Even perfectly projected sound fails if words are unclear.
The Relationship Between Projection and Articulation
Projection ensures your voice reaches the audience. Articulation ensures they understand what you’re saying. Together, they create effective stage communication.
Different mediums require different projection approaches[4]:
- Live theater: More vocal energy and exaggerated pronunciation for large venues
- Film: Adjustments based on set size and distance
- Voice-over work: Minimal projection due to microphone proximity
Articulation Exercises for Theater Beginners
Exercise 1: Consonant Precision
Practice these consonant-heavy phrases:
- “The tip of the tongue, the teeth, the lips”
- “Red leather, yellow leather” (repeat 5 times quickly)
- “Unique New York, New York unique”
- “Peter Piper picked a peck of pickled peppers”
Focus on crisp consonants without sacrificing vocal flow.
Exercise 2: Vowel Purity
Practice pure vowel sounds:
- AH (as in “father”)
- AY (as in “say”)
- EE (as in “see”)
- OH (as in “go”)
- OO (as in “too”)
Maintain consistent resonance and projection across all vowel sounds.
Exercise 3: Over-Articulation Practice
- Choose a monologue or speech
- Perform it with exaggerated articulation
- Make every consonant crisp and every vowel clear
- Then dial back to 70% of that exaggeration for performance
This technique ensures clarity reaches the back row without appearing unnatural.
Jaw and Tongue Flexibility
Tension in the jaw and tongue restricts articulation. Practice these releases:
Jaw Release:
- Gently massage jaw joints
- Open mouth wide and yawn
- Move jaw side to side
- Circle jaw slowly in both directions
Tongue Flexibility:
- Stick tongue out and move it in all directions
- Touch tongue to nose, chin, and corners of mouth
- Roll tongue if possible
- Press tongue against teeth and release
Daily Warm-Up Routine: Building Professional Habits
At least 30 minutes per day of vocal warm-ups including body work, breath control, phonation, projection, and articulation exercises is recommended to develop proper technique[4]. Consistent practice transforms technique into habit.
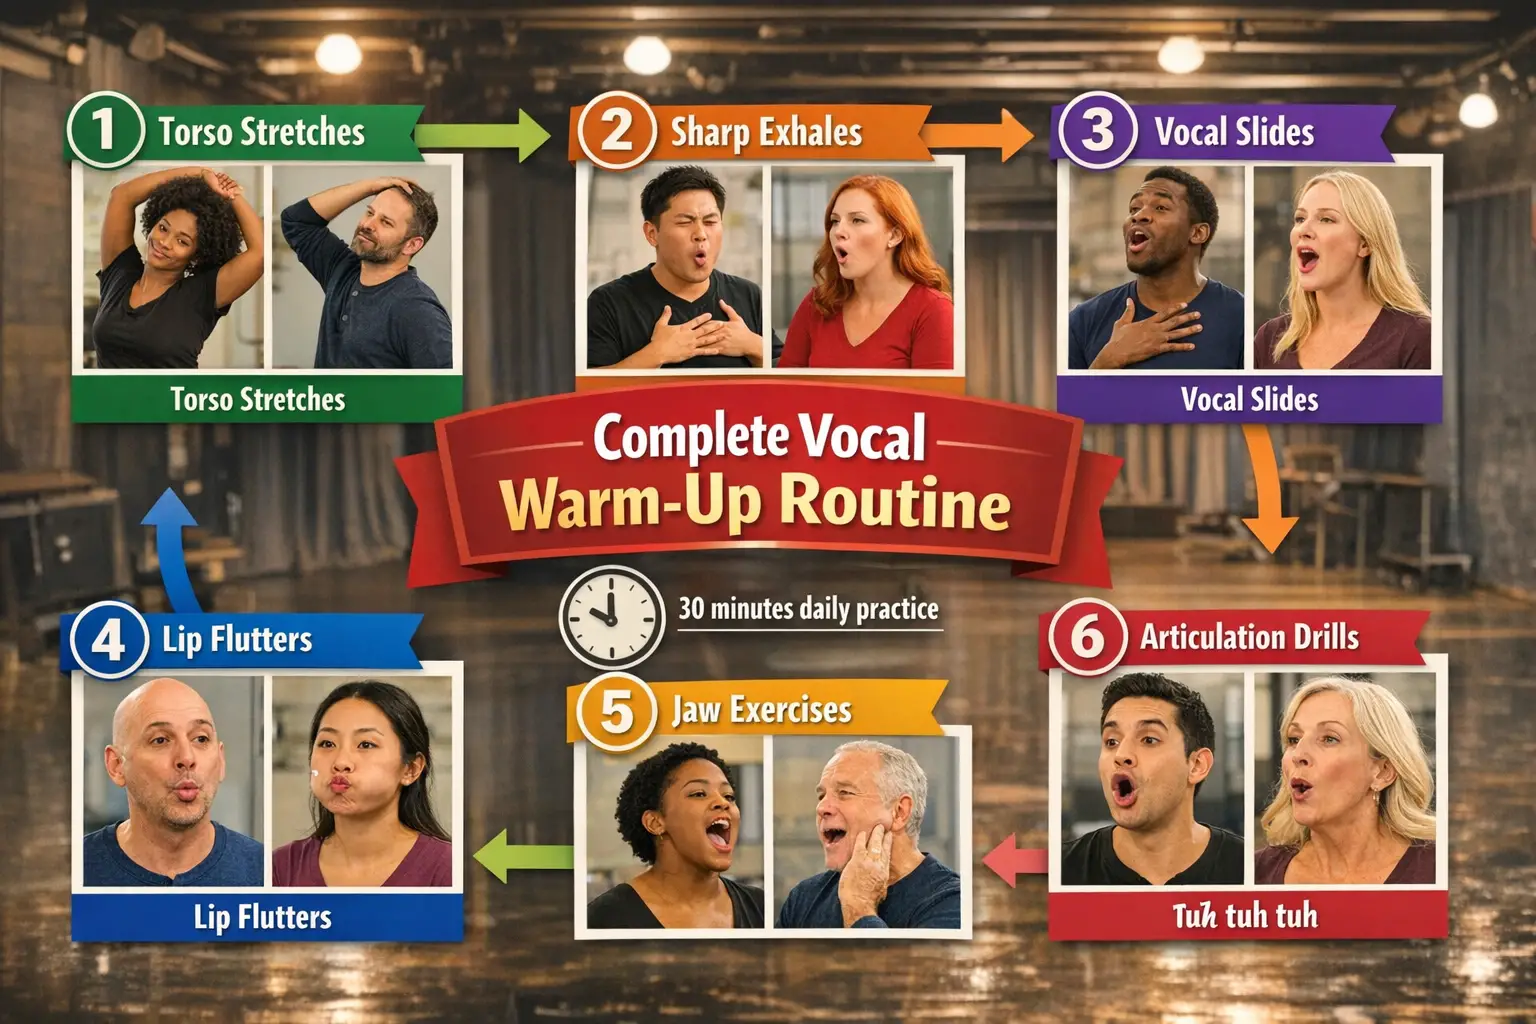
The Complete 30-Minute Warm-Up
Phase 1: Body Work (5 minutes) 🧘
Specific warm-ups including torso stretches, sharp exhales, vocal slides, lip flutters, and jaw exercises prepare the voice for projection and prevent fatigue[7].
- Neck rolls (both directions)
- Shoulder rolls (both directions)
- Torso twists
- Side stretches
- Forward fold and slow roll-up
Phase 2: Breath Control (5 minutes) 💨
- Diaphragmatic breathing practice
- “Ha” exercise (10 repetitions)
- Breath capacity building (inhale for 4, hold for 4, exhale for 8)
- Sustained “sss” sound (measure duration, try to extend)
Phase 3: Phonation (5 minutes) 🎵
- Gentle humming
- Lip trills on scales
- Siren slides (low to high)
- “Ng” to vowel transitions
Phase 4: Projection Practice (10 minutes) 📢
- Rainbow Projection exercise
- Target point practice (near, medium, far)
- Resonance placement exercises
- Volume modulation practice
Phase 5: Articulation (5 minutes) 🗣️
- Tongue twisters
- Consonant precision drills
- Vowel purity exercises
- Text work with over-articulation
Pre-Performance Warm-Up Checklist
Before stepping on stage, complete this abbreviated routine:
- ✅ 5 minutes of body stretches
- ✅ 3 minutes of breath work
- ✅ 5 minutes of vocal warm-ups
- ✅ 2 minutes of articulation practice
- ✅ Run challenging lines from your role
Applying Voice and Movement Basics in Rehearsal
Understanding Voice and Movement Basics for Theater Beginners: Projection Without Shouting in theory differs from applying these techniques during actual rehearsals and performances. Integration requires deliberate practice and awareness.
First Rehearsal Strategies
Strategy 1: Mark Your Breath
- During initial table reads, mark your script with breath indicators
- Note where natural breath points occur
- Plan breath support for long phrases
Strategy 2: Test the Space
- Arrive early to rehearsal or performance venues
- Practice projection in the actual space
- Identify acoustic challenges (dead spots, echoes)
- Adjust technique accordingly
Strategy 3: Record and Review
- Record rehearsals on your phone
- Listen for clarity and projection
- Identify areas needing improvement
- Track progress over time
Common Beginner Mistakes and Solutions
| Mistake | Why It Happens | Solution |
|---|---|---|
| Dropping volume at line ends | Running out of breath support | Mark breath points; maintain core engagement through entire phrase |
| Pushing from the throat | Trying to force volume | Return to diaphragmatic breathing; focus on resonance placement |
| Losing projection during movement | Forgetting technique during blocking | Practice speaking while moving; breathe before transitions |
| Inconsistent volume | Lack of awareness | Use target points; ask for feedback from directors and fellow actors |
| Tension in shoulders/jaw | Performance anxiety | Include relaxation exercises in warm-up; breathe deeply between scenes |
Working with Directors and Fellow Actors
Communication about vocal needs strengthens ensemble work:
- Ask for feedback: “Can you hear me clearly in the back?”
- Communicate challenges: “This blocking makes projection difficult; can we adjust?”
- Support scene partners: Notice when others need vocal support and adjust your own volume
- Practice together: Run scenes with focus on projection and articulation
Advanced Techniques for Continued Growth
Once the fundamentals of Voice and Movement Basics for Theater Beginners: Projection Without Shouting become comfortable, actors can explore more sophisticated techniques.
Character Voice and Projection
Different characters require different vocal approaches while maintaining healthy projection:
Elderly Character 👴
- May have reduced volume
- Still requires proper breath support
- Use resonance changes rather than throat constriction
Child Character 👧
- Higher pitch placement
- Maintain forward resonance
- Don’t strain to create the voice
Powerful Authority Figure 👔
- Strong chest resonance
- Deliberate pacing
- Full breath support
Emotional Intensity Without Vocal Damage
Portraying intense emotions (anger, fear, grief) challenges vocal health:
Safe Techniques for Emotional Scenes:
- Anger: Use chest resonance and sharp consonants rather than shouting
- Crying: Support breath even during emotional moments
- Screaming: Learn theatrical scream technique (uses breath, not throat)
- Whispering: Project the whisper using breath and articulation
Maintaining Vocal Health
Professional actors protect their instrument:
- 💧 Stay hydrated: Drink water throughout the day
- 🚭 Avoid irritants: Limit caffeine, alcohol, and smoking
- 😴 Get adequate rest: Vocal cords repair during sleep
- 🍵 Use steam: Humidify vocal cords, especially in dry climates
- 🤐 Rest your voice: Schedule vocal rest between performances
- 🏥 Seek help: Consult voice specialists if experiencing persistent problems
Conclusion: Your Journey to Confident Projection
Mastering Voice and Movement Basics for Theater Beginners: Projection Without Shouting transforms nervous beginners into confident performers who command audience attention without sacrificing vocal health. The techniques outlined in this guide—diaphragmatic breathing, proper posture, visualization exercises, resonance placement, and articulation practice—form the foundation of professional stage work.
Actionable Next Steps
This Week:
- ✅ Practice diaphragmatic breathing for 10 minutes daily
- ✅ Complete the “ha” exercise each morning
- ✅ Record yourself reading aloud and assess clarity
- ✅ Identify your natural resonance placement
This Month:
- ✅ Establish a 30-minute daily warm-up routine
- ✅ Practice the Rainbow Projection exercise in different spaces
- ✅ Work through articulation exercises with tongue twisters
- ✅ Apply techniques during rehearsals with awareness and intention
This Year:
- ✅ Develop consistent vocal habits that protect your instrument
- ✅ Expand your understanding through voice lessons or workshops
- ✅ Document your progress and celebrate improvements
- ✅ Share knowledge with fellow performers to strengthen ensemble work
Remember that vocal development is a lifelong journey. Even experienced professionals continue practicing these fundamentals daily. The difference between amateur and professional performers often lies not in natural talent, but in consistent application of proper technique.
Your voice is your most valuable tool as an actor. By investing time in these exercises for breath control, articulation, and stage blocking, you’ll command audiences confidently from your very first rehearsal through countless performances. The stage awaits—project with power, clarity, and confidence! 🎭✨
References
[1] Beginner Guide To Voice Projection And Improvisation In Theatre – https://www.nancycastrogiovanni.com/beginner-guide-to-voice-projection-and-improvisation-in-theatre
[2] Projecting Your Voice Without Yelling – https://www.theatrefolk.com/blog/projecting-your-voice-without-yelling
[3] Watch – https://www.youtube.com/watch?v=_dk250_m2gc
[4] The Importance Of Learning Voice Projection Articulation And Diction – https://castingfrontier.com/blog/the-importance-of-learning-voice-projection-articulation-and-diction/
[6] Watch – https://www.youtube.com/watch?v=hSyAyBK8ghw
[7] Tips For Speaking Loudly Clearly As An Actor 73193 – https://www.backstage.com/magazine/article/tips-for-speaking-loudly-clearly-as-an-actor-73193/