

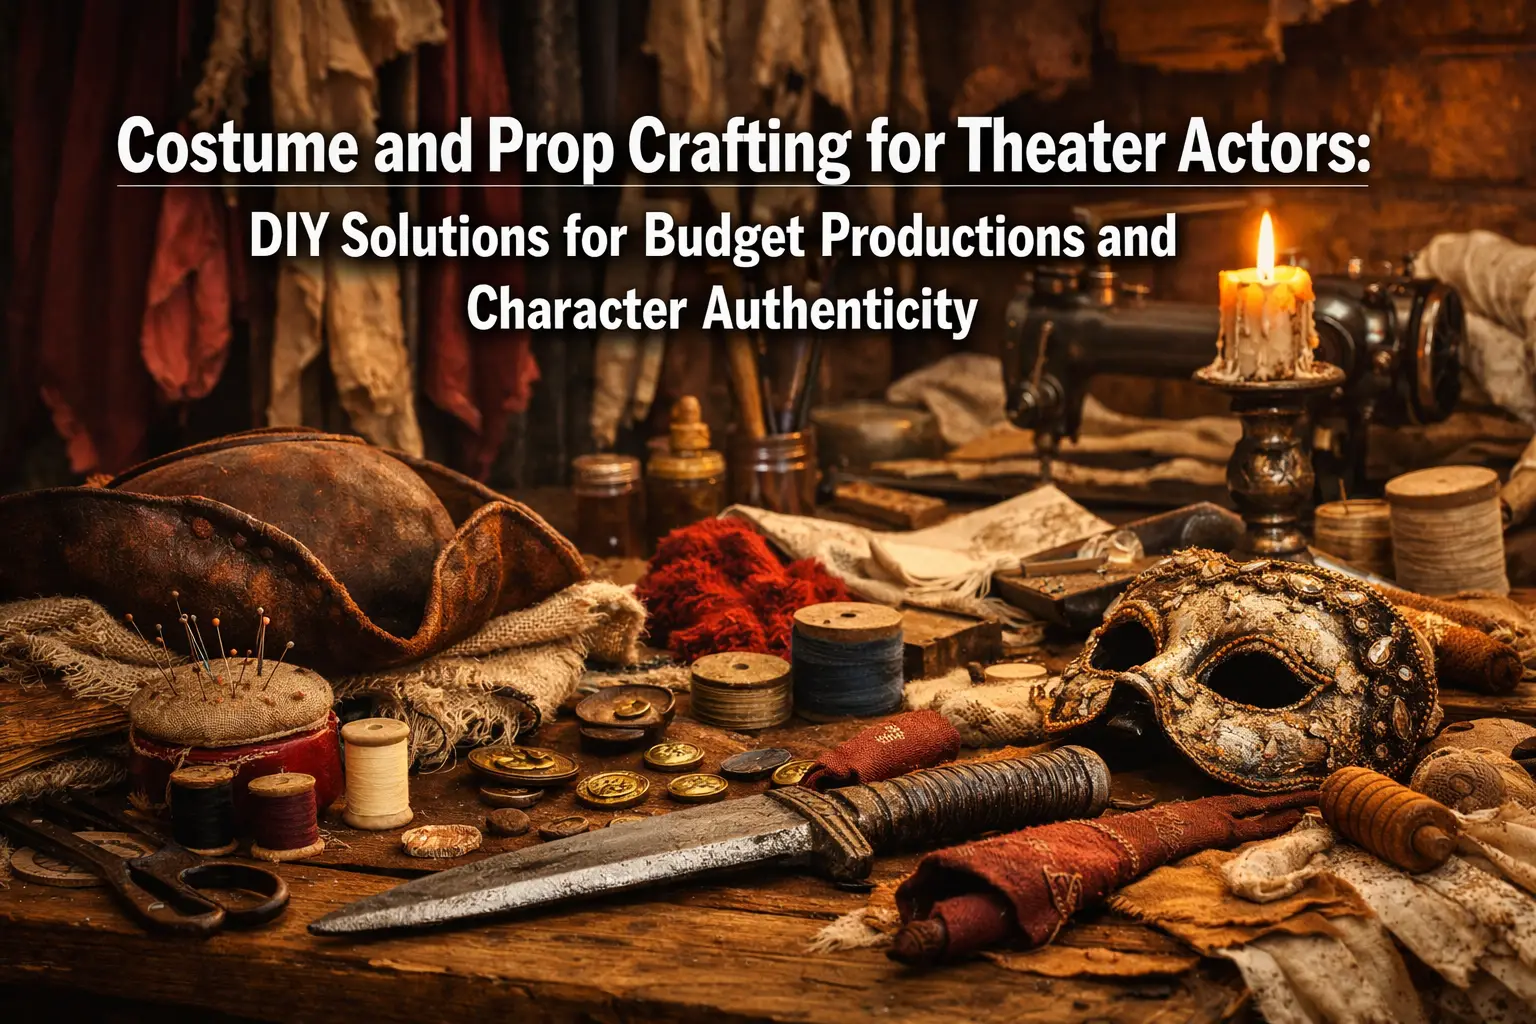
Look, after three decades of stepping onto stages from black box theaters to regional playhouses, I’ve learned one universal truth: the costume budget is always smaller than you need, and the prop list is always longer than anyone expected. But here’s the beautiful secret that seasoned actors discover—Costume and Prop Crafting for Theater Actors: DIY Solutions for Budget Productions and Character Authenticity isn’t just about saving money. It’s about creating something genuine, something lived-in, something that helps you become the character from the outside in.
In 2026, there’s a craft movement happening that theater folks should be paying attention to. It’s called wabi-sabi—the Japanese philosophy of finding beauty in imperfection, authenticity in the handmade, and character in the worn [2]. Sound familiar? That’s exactly what we do on stage. Every frayed hem, every visible stitch, every repurposed vintage piece tells a story. And when you’re the one crafting these elements yourself, you’re not just saving the production money—you’re building your character’s world with your own hands.
Key Takeaways
- Embrace imperfection: The 2026 wabi-sabi craft trend aligns perfectly with authentic character work—visible stitching, layered textures, and handmade elements create costumes with genuine depth and history
- Thrift stores are treasure troves: Basic garments can be transformed through dyeing, embellishing, and altering to fit any period or character requirement while staying budget-friendly
- DIY accessories elevate characters: Handcrafted hats, jewelry, belts, and props using affordable materials like foam, wire, and fabric scraps add authenticity that store-bought items can’t match
- Collaboration is essential: Working closely with hair, makeup, and props teams ensures all visual elements align to create a cohesive, believable character
- Basic skills go far: Simple sewing, painting, and crafting techniques can transform inexpensive materials into professional-looking costume pieces and props
Understanding the Power of Handmade Theater Elements
Let me tell you about a production of A Streetcar Named Desire I did years ago. The costume designer handed me a pristine vintage-style dress from a rental house. It looked perfect—too perfect. Blanche DuBois had been through hell, and this dress looked like it just came from Nordstrom’s. So I took it home, tea-stained the hem, added some hand-stitching repairs with slightly mismatched thread, and frayed one sleeve cuff. Suddenly, that dress had a history. It had Blanche’s desperation sewn right into it.
That’s what Costume and Prop Crafting for Theater Actors: DIY Solutions for Budget Productions and Character Authenticity is really about. Theater costumes serve a crucial purpose beyond just clothing—they help bring characters to life on stage and communicate essential information about personality, social status, and the story’s time period [1]. When you craft these elements yourself, you’re not just making clothes; you’re making character archaeology.
Why DIY Matters in 2026
The craft landscape in 2026 has shifted toward authenticity and sustainability [3]. Audiences—even theater audiences—can spot cheap, mass-produced fakery a mile away. But something handmade? Something with visible texture and imperfect beauty? That reads as real under stage lights.
Plus, let’s be honest about theater budgets. Unless you’re working on Broadway (and even then), you’re probably dealing with limited resources. Learning to craft your own costume elements and props isn’t just a nice skill—it’s often a necessity that can make you invaluable to any production.
The Wabi-Sabi Approach to Costume and Prop Crafting for Theater Actors
Here’s where 2026’s hottest craft trend becomes your secret weapon. Wabi-sabi celebrates the beauty of imperfection, the authenticity of handmade items, and the character that comes with age and use [2]. This philosophy is absolutely perfect for theater work.
Think about it: What character in dramatic literature has a perfectly pristine wardrobe? Even wealthy characters have worn their clothes, lived in them, experienced life in them. The visible hand-stitching, the slightly uneven hem, the patched elbow—these aren’t mistakes. They’re character details.
Practical Wabi-Sabi Techniques for Theater
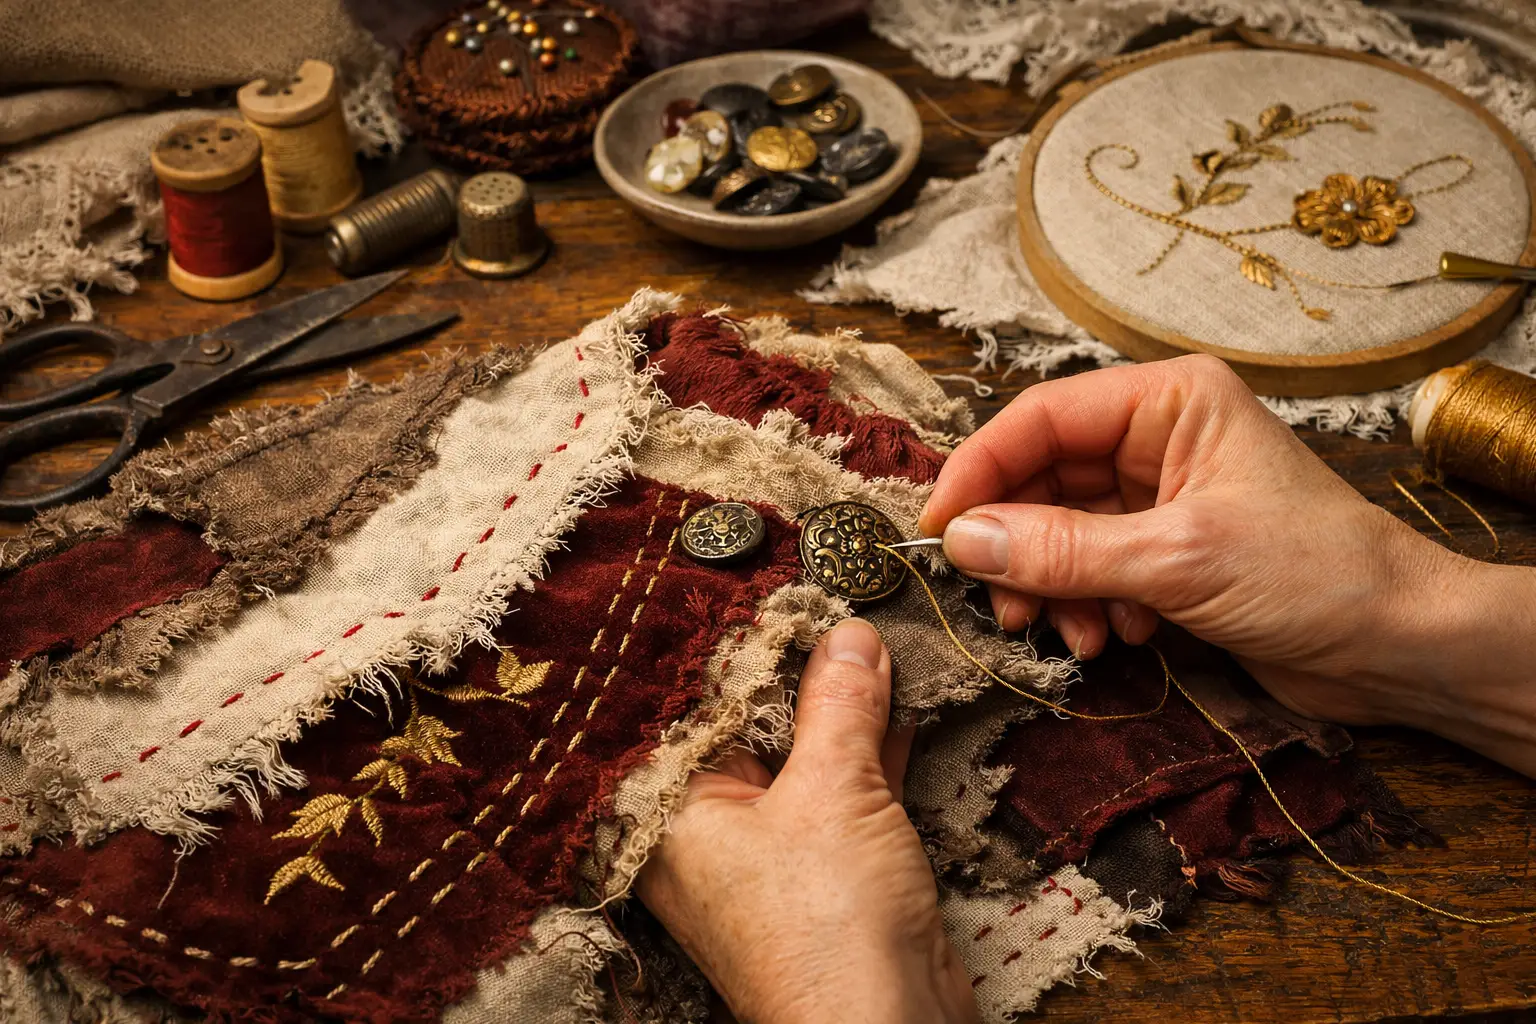
Visible Stitching as Character Detail
Instead of hiding your seams and repairs, make them part of the story:
- Use contrasting thread colors for repairs that show your character has mended their own clothes
- Create decorative hand-stitching that reflects your character’s skill level (perfect for a seamstress character, imperfect for a farmer)
- Layer patches over worn areas using fabrics that suggest your character’s economic status
Layered Fabrics and Textures
The wabi-sabi trend embraces mixed materials and layered textures [2]:
- Combine different fabric weights to create visual interest and suggest multiple garments worn together
- Layer sheer fabrics over solid ones for depth without bulk
- Mix vintage and modern materials—the audience won’t know the difference under stage lights
Intentional Distressing
This isn’t about making things look “old”—it’s about making them look lived-in:
- Tea or coffee staining creates subtle aging without looking costume-y
- Strategic fraying at stress points (cuffs, hems, collar edges) suggests genuine wear
- Gentle fading with diluted bleach can create sun-worn effects on outdoor character costumes
Thrift Store Treasure Hunting: The Foundation of Budget Costume Crafting
If thrift stores were stocks, I’d tell you to invest everything you have. Seriously, thrift shopping is the backbone of budget theater costuming. But it’s not just about finding cheap clothes—it’s about finding potential.
What to Look For
When I hit the thrift stores (and I still do, even after 30 years), I’m not looking for complete costumes. I’m looking for:
Basic Garment Structures
- Simple jackets that can be embellished or altered
- Plain skirts in various lengths and cuts
- Basic shirts and blouses in neutral colors
- Pants with good structure and fit
Vintage Pieces with Good Bones
- Items with interesting construction details
- Garments made from quality fabrics
- Pieces with unique buttons, collars, or trim that can be repurposed
Transformation Candidates
- White or light-colored items that can be dyed
- Oversized pieces that can be taken in or reconstructed
- Damaged items with salvageable parts (buttons, trim, good fabric sections)
The Art of Alteration and Transformation
Here’s where basic sewing skills become gold. You don’t need to be a master tailor—just competent with a sewing machine and willing to learn. Here are techniques that have saved me thousands over the years:
Dyeing for Character
A $5 white thrift store shirt becomes a $5 period-appropriate colored shirt with one box of dye:
- Use fiber-reactive dyes for natural fabrics (cotton, linen, silk)
- Create ombré effects by dipping partially
- Over-dye existing colors for richer, more complex tones
- Tea and coffee create beautiful vintage tones for period pieces
Embellishment Magic
Transform plain into spectacular:
- Add lace to collars and cuffs for Victorian or Edwardian pieces
- Sew on vintage buttons (collect these whenever you find them!)
- Create embroidery details by hand or machine
- Attach trim, ribbon, or braid to define edges and add visual interest
Strategic Reconstruction
Sometimes you need to get creative:
- Combine two damaged garments into one functional piece
- Remove sleeves from one jacket and add them to another
- Take in or let out seams to adjust fit
- Shorten, lengthen, or reshape hemlines
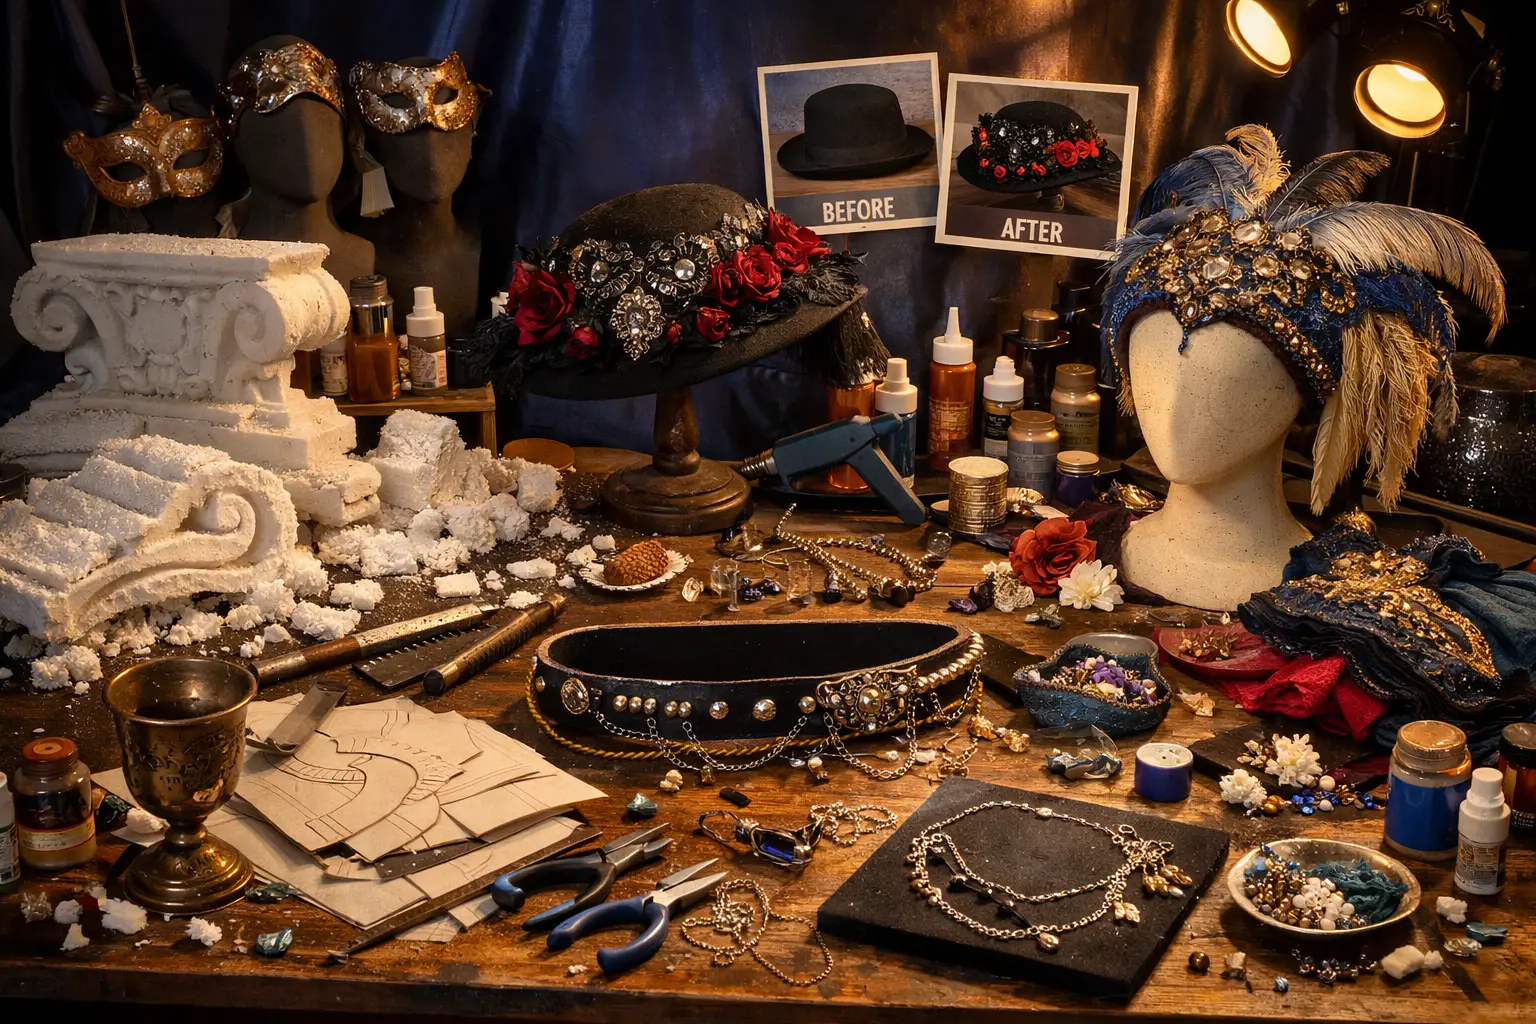
DIY Props and Accessories: Small Details, Big Impact
Props and accessories are where you can really flex your creative muscles without breaking the bank. I’ve made everything from Elizabethan ruffs to 1920s headpieces using materials from craft stores and hardware shops.
Essential Materials to Keep on Hand
Build yourself a crafting kit with these basics:
| Material | Uses | Approximate Cost |
|---|---|---|
| Craft foam (various thicknesses) | Armor, decorative elements, hat bases | $1-5 per sheet |
| Wire (floral and jewelry gauge) | Jewelry, crowns, structural support | $3-10 per spool |
| Fabric scraps | Flowers, trim, small accessories | Free from alterations |
| Hot glue gun + glue sticks | Attaching everything | $5-15 |
| Acrylic paint | Aging, detailing, color matching | $1-3 per bottle |
| Mod Podge or fabric stiffener | Shaping fabric, creating structure | $5-8 |
| Beads, chains, findings | Jewelry, embellishment | $5-20 |
Creating Specific Accessories
Hats and Headpieces 🎩
Hats define character instantly. Here’s how to make them affordably:
- Start with a base: Thrift store hats, foam forms, or even cardboard covered in fabric
- Shape with heat: Craft foam becomes moldable with a heat gun
- Cover and embellish: Use fabric, trim, feathers, flowers, or whatever fits your character
- Secure properly: Add elastic, bobby pin loops, or combs so it stays put during performance
Jewelry and Personal Items 💍
These small touches complete a character:
- Wire-wrapped pendants: Twist jewelry wire around beads or stones for custom necklaces
- Chain combinations: Layer different chain styles from craft stores for period looks
- Polymer clay: Bake custom buttons, brooches, or decorative elements
- Repurposed vintage: Broken thrift store jewelry becomes components for new pieces
Belts and Waist Accessories
A belt can completely change a silhouette:
- Cut leather or pleather from fabric stores
- Add grommets and lacing for medieval or fantasy looks
- Attach decorative elements with strong glue or rivets
- Create sashes from fabric remnants
Prop Construction Basics
Props range from simple to complex, but most can be built with basic materials:
Lightweight Props (books, boxes, decorative items)
- Cardboard and papier-mâché form the base
- Paint and detail for realism
- Seal with Mod Podge for durability
Weapons and Armor (when safety is paramount)
- Foam is your friend—it’s lightweight and safe
- Layer and shape with heat
- Paint with acrylics and seal
- Add metallic finishes with rub-on wax or spray paint
Period-Specific Items
- Research images thoroughly
- Simplify complex designs to their essential visual elements
- Remember: it needs to read from 20 feet away, not pass museum authentication
Sewing Skills: Your Most Valuable Theater Investment
I learned to sew out of necessity during a production where the costume budget was literally $200 for a cast of fifteen. Best skill I ever acquired. You don’t need to be a master seamstress, but basic sewing competency will save you thousands over your career and make you indispensable to directors and fellow actors.
Essential Sewing Skills for Actors
Hand Sewing Basics
- Running stitch for basic seams and gathering
- Backstitch for strength and repairs
- Slip stitch for invisible hems
- Button attachment (properly, so they don’t fall off mid-scene!)
Machine Sewing Fundamentals
- Straight seams and seam finishing
- Hemming techniques
- Installing zippers
- Basic alterations (taking in, letting out)
Pattern Work
- Reading and following simple patterns
- Making basic adjustments for fit
- Creating simple patterns from existing garments
- Understanding grain lines and fabric behavior
Quick Alterations That Transform Garments
These are the alterations I do most frequently:
✂️ Taking in or letting out side seams (changes fit dramatically)
✂️ Hemming (adjusts length and proportion)
✂️ Adding or removing sleeves (changes period and style)
✂️ Adjusting necklines (creates different character impressions)
✂️ Adding darts (improves fit and silhouette)
When to Sew vs. When to Glue
Here’s a professional secret: not everything needs to be sewn. For theater purposes:
Sew when:
- The garment needs to withstand multiple performances
- The area experiences stress or movement
- The item will be washed
- Structural integrity matters
Glue when:
- Attaching embellishments that won’t be stressed
- Working with materials that don’t sew well (foam, leather, some synthetics)
- Time is extremely limited
- The attachment point won’t be visible up close
Use fabric glue or hot glue depending on the materials and stress level. I’ve had hot-glued embellishments last through entire runs without issues.
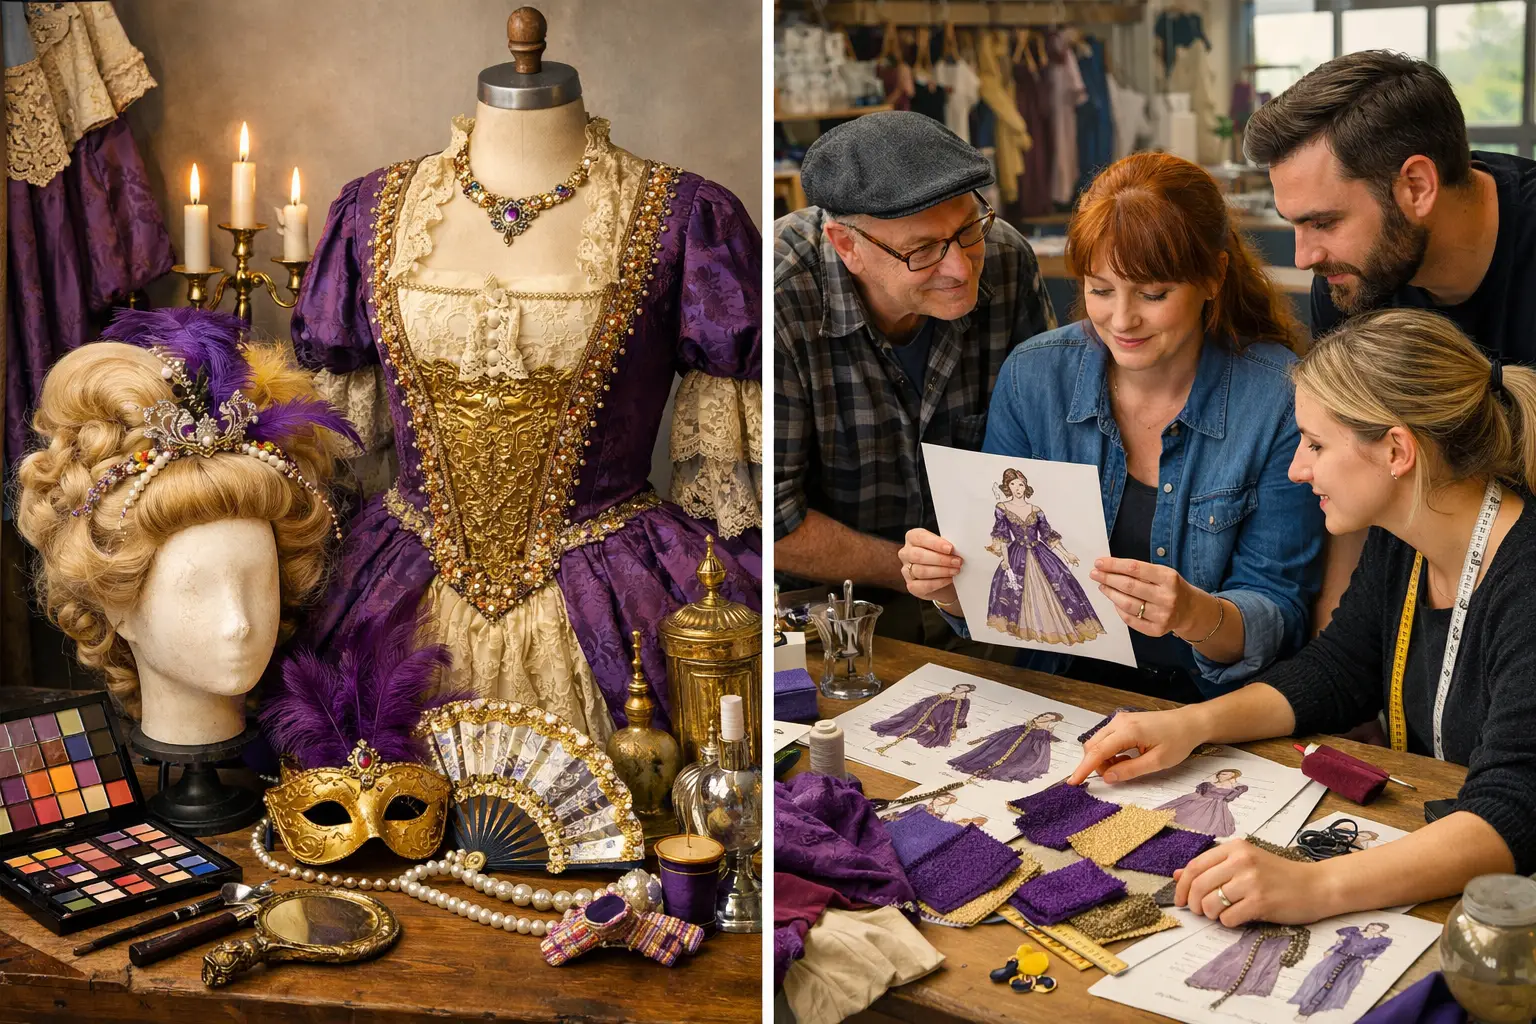
Collaboration: Integrating Costume and Prop Crafting with Hair, Makeup, and Props Teams
Here’s something that took me years to fully appreciate: your costume doesn’t exist in isolation. The most authentic character work happens when costume, hair, makeup, and props all speak the same visual language.
Creating a Cohesive Character Look
When you’re crafting your own costume elements, you need to coordinate with the full production team:
With the Hair/Wig Department:
- Share color swatches from your costume fabrics
- Discuss the character’s economic status and grooming habits
- Coordinate embellishments (if your costume has beading, maybe the hair accessory should too)
- Consider period accuracy together—hair and costume must match the same era
With Makeup:
- Discuss the color palette of your costume
- Coordinate aging and distressing (worn costume = character who might have sun damage, work-roughened hands)
- Share character research and references
- Ensure makeup intensity matches costume formality
With Props:
- Make sure hand props complement costume style and period
- Coordinate materials and finishes (if you’re using aged brass on costume, props should match)
- Consider practical needs (pockets for props? Attachment points for frequently-used items?)
- Share your character’s backstory so props reflect the same history
Communication is Key
In my experience, the best-looking productions happen when everyone talks to everyone else. Share your DIY costume plans early:
- Show sketches or reference images
- Bring material samples to production meetings
- Ask for feedback before you start cutting or gluing
- Be open to adjustments that serve the overall production
“Theater is collaborative art. Your handmade costume piece might inspire the set designer, or the props master might have materials you can use. Talk to each other.” – Advice from 30 years of productions
Budget-Conscious Material Sourcing in 2026
Knowing where to find materials affordably is half the battle. Here’s my current sourcing strategy:
Best Sources for Craft Materials
Thrift Stores (obviously)
- Goodwill, Salvation Army, local charity shops
- Estate sales for vintage treasures
- Consignment shops for higher-quality basics
Fabric Stores (with strategy)
- Shop remnant bins for small yardage at huge discounts
- Use coupons (40-50% off is standard at major chains)
- Buy end-of-bolt pieces
- Check clearance sections after holidays
Online Marketplaces
- Facebook Marketplace for local fabric stashes
- Craigslist free sections for materials
- eBay for vintage buttons, trim, and notions
- Etsy for unique embellishments (but watch costs)
Hardware Stores
- Spray paint for props and accessories
- Wire, chain, and fasteners
- Tools for construction
- Weathering and aging materials
Dollar Stores
- Basic craft supplies
- Foam sheets and poster board
- Glue, tape, and adhesives
- Seasonal items for repurposing
Building a Material Library
Smart actors and costumers collect materials over time:
- Save scraps from every project (you’ll need that exact color someday)
- Collect buttons from garments before donating them
- Store trim and ribbon organized by color or style
- Keep a notion box of zippers, snaps, hooks, and elastic
- Maintain a reference folder of images organized by period and style
Advanced Techniques for Character Authenticity Through Costume and Prop Crafting
Once you’ve mastered the basics, these advanced techniques take your work to the next level:
Aging and Distressing for Realism
Characters have lived in their clothes. Show it:
Fabric Aging:
- Sandpaper on edges and stress points
- Diluted bleach for sun-fading effects
- Strategic small tears and repairs
- Dirt and grime (use powdered makeup or paint, not actual dirt that won’t wash out)
Paint Techniques:
- Dry brushing for highlights and wear patterns
- Washes for shadows and depth
- Spattering for mud or blood effects
- Layering colors for complex, realistic aging
Period-Specific Details
Research is your friend. For authentic period work:
- Study primary sources: Historical photographs, paintings, fashion plates
- Focus on silhouette: Getting the overall shape right matters more than perfect details
- Prioritize visible elements: Spend time on what the audience sees
- Simplify construction: Find modern techniques that achieve period looks
- Cheat smartly: Use modern materials that look period-appropriate under stage lights
Creating Texture and Dimension
Flat costumes look flat on stage. Add dimension:
- Layer different fabric weights
- Add topstitching in contrasting thread
- Create pleats, tucks, and gathering
- Attach three-dimensional elements (flowers, bows, trim)
- Use paint to create shadows and highlights
Practical Project Examples: From Concept to Stage
Let me walk you through some actual projects I’ve done or coached actors through:
Project 1: Victorian Working-Class Costume (Budget: $30)
Starting point: Thrift store finds
- Long brown skirt ($4)
- White cotton blouse ($3)
- Men’s vest ($5)
Materials purchased:
- Brown cotton fabric for apron ($6)
- Lace trim ($4)
- Vintage-style buttons ($3)
- Tea bags for aging (already had)
Process:
- Tea-stained the blouse for aged appearance
- Sewed simple apron from brown fabric
- Added lace to blouse collar and cuffs
- Replaced vest buttons with vintage ones
- Distressed hem and cuffs
- Added visible mending patches to skirt
Result: Authentic-looking Victorian working woman’s costume that photographed beautifully and lasted through 12 performances.
Project 2: Fantasy Crown/Headpiece (Budget: $15)
Materials:
- Craft foam sheets ($3)
- Metallic spray paint ($5)
- Wire ($2)
- Beads and jewels from old jewelry ($0 – repurposed)
- Hot glue ($2)
- Elastic ($1)
Process:
- Cut crown shape from thick foam
- Added dimensional details with thinner foam layers
- Spray painted with metallic finish
- Glued on repurposed jewels and beads
- Attached wire for additional decorative elements
- Added elastic for secure fit
Result: Stunning fantasy crown that looked expensive and held up through entire run plus promotional photos.
Project 3: 1940s Gentleman’s Accessories (Budget: $20)
Starting point:
- Thrift store suit (already owned)
Created:
- Pocket square from vintage fabric scrap ($2)
- Tie bar from painted wire and small vintage button ($0 – materials on hand)
- Collar pin from jewelry findings ($3)
- Hat band for existing hat using ribbon and vintage buckle ($5)
- Cufflinks from vintage buttons and findings ($4)
- Aged leather gloves using paint ($6 thrift store gloves)
Result: Complete period-accurate accessories that elevated the entire costume and helped define the character’s attention to appearance.
Troubleshooting Common Costume and Prop Crafting Challenges
After 30 years, I’ve encountered (and solved) pretty much every crafting disaster. Here are the most common issues:
Problem: Not Enough Time
Solutions:
- Prioritize what the audience sees most
- Use glue instead of sewing where appropriate
- Simplify your design
- Ask for help from cast mates
- Focus on one standout piece rather than perfect everything
Problem: Limited Budget
Solutions:
- Repurpose and reimagine existing items
- Trade skills with other actors (you sew, they paint, etc.)
- Shop thrift stores in wealthy neighborhoods
- Use coupons strategically
- Create the illusion of expensive materials with paint and technique
Problem: Lack of Skills
Solutions:
- YouTube is your free teacher (seriously, you can learn anything)
- Start with simple projects and build skills
- Ask experienced actors or costumers for help
- Practice on scrap materials first
- Remember: done is better than perfect
Problem: Materials Don’t Behave as Expected
Solutions:
- Test everything on scraps first
- Research material properties before purchasing
- Have backup plans
- Ask at fabric stores for advice
- Join online crafting communities for troubleshooting help
Building Your Costume Crafting Skills Over Time
Don’t expect to master everything immediately. I’m still learning new techniques three decades in. Here’s how to develop your skills strategically:
Beginner Level (First Year)
✅ Master basic hand sewing
✅ Learn to use a sewing machine
✅ Practice simple alterations
✅ Experiment with fabric dyeing
✅ Create basic accessories
Intermediate Level (Years 2-3)
✅ Work from simple patterns
✅ Create structured props
✅ Master aging and distressing
✅ Develop embellishment techniques
✅ Coordinate full character looks
Advanced Level (Years 4+)
✅ Design original costume pieces
✅ Work with complex materials
✅ Create period-accurate details
✅ Build elaborate props
✅ Mentor other actors
The Business Case for DIY Costume Skills
Let’s talk practical career benefits. When you can handle Costume and Prop Crafting for Theater Actors: DIY Solutions for Budget Productions and Character Authenticity, you become:
More Castable: Directors love actors who can contribute beyond just performing. If you can handle your own basic costume needs, you’re more valuable, especially in smaller productions.
More Employable: Community theaters, educational theater, and small professional companies often need people who can wear multiple hats. Costume skills make you indispensable.
More Prepared: You can create your own audition looks, headshot wardrobe, and self-tape costumes without additional expense.
More Collaborative: Understanding the costume process makes you a better scene partner and ensemble member.
More Creative: These skills enhance your overall artistic toolkit and character development process.
Conclusion: Crafting Your Way to Authentic Performances
Here’s what I want you to take away from three decades of making costumes work on impossible budgets: Costume and Prop Crafting for Theater Actors: DIY Solutions for Budget Productions and Character Authenticity isn’t a compromise—it’s an opportunity.
Every time you hand-stitch a repair into your character’s jacket, you’re thinking about who they are and how they live. Every time you age a prop or embellish a hat, you’re making choices about your character’s world. This isn’t just about saving money (though that’s nice). It’s about building your character from the outside in, creating tangible, touchable elements of their life that you can literally wear and hold.
The 2026 embrace of wabi-sabi and handmade authenticity [2] means your DIY costume work isn’t just acceptable—it’s actually more aligned with contemporary aesthetic values than expensive rentals. Those visible stitches, that layered texture, that perfectly imperfect handmade quality? That’s not amateur hour. That’s artistry.
Your Action Plan
Start small and build your skills:
This week: Visit a thrift store with a character in mind. Find one piece you can transform.
This month: Learn one new skill (hand sewing, dyeing, or basic prop-making). YouTube is free.
This production: Create one costume element or prop yourself, even if it’s just accessories.
This year: Build your material library and tool kit. Collect, save, organize.
Long term: Make costume crafting part of your regular character development process.
Remember, every expert was once a beginner holding a needle and thread, wondering if they could really do this. You can. Start with one project, one skill, one character at a time. Your future self (and your future directors) will thank you.
Now get out there and make something beautiful, imperfect, and authentically yours. Break a leg! 🎭
References
[1] A Comprehensive Guide To Theater Costumes Bringing Characters To Life On Stage – https://thefactorytheater.com/a-comprehensive-guide-to-theater-costumes-bringing-characters-to-life-on-stage/
[2] Craft Trends To Watch In 2026 – https://www.artbeatbox.com/blog/craft-trends-to-watch-in-2026
[3] The Top Crafting Ideas For 2026 Youll Want To Try This Year – https://my100yearoldhome.com/the-top-crafting-ideas-for-2026-youll-want-to-try-this-year/